Salesforce Bulk Connector Example
The Salesforce Bulk Connector allows you to access the Salesforce Bulk REST API from an integration sequence. SalesforceBulk is a RESTful API that allows you to quickly load large sets of your organization's data into Salesforce or delete large sets of your organization's data from Salesforce. You can use SalesforceBulk to query, insert, update, upsert or delete a large number of records asynchronously, by submitting the records in batches. Salesforce can process these batches in the background.
What you'll build
This example demonstrates how to use Microsoft Azure Storage connector to:
- Insert employee details (job and batch) into Salesforce.
- Get status of the inserted employee details.
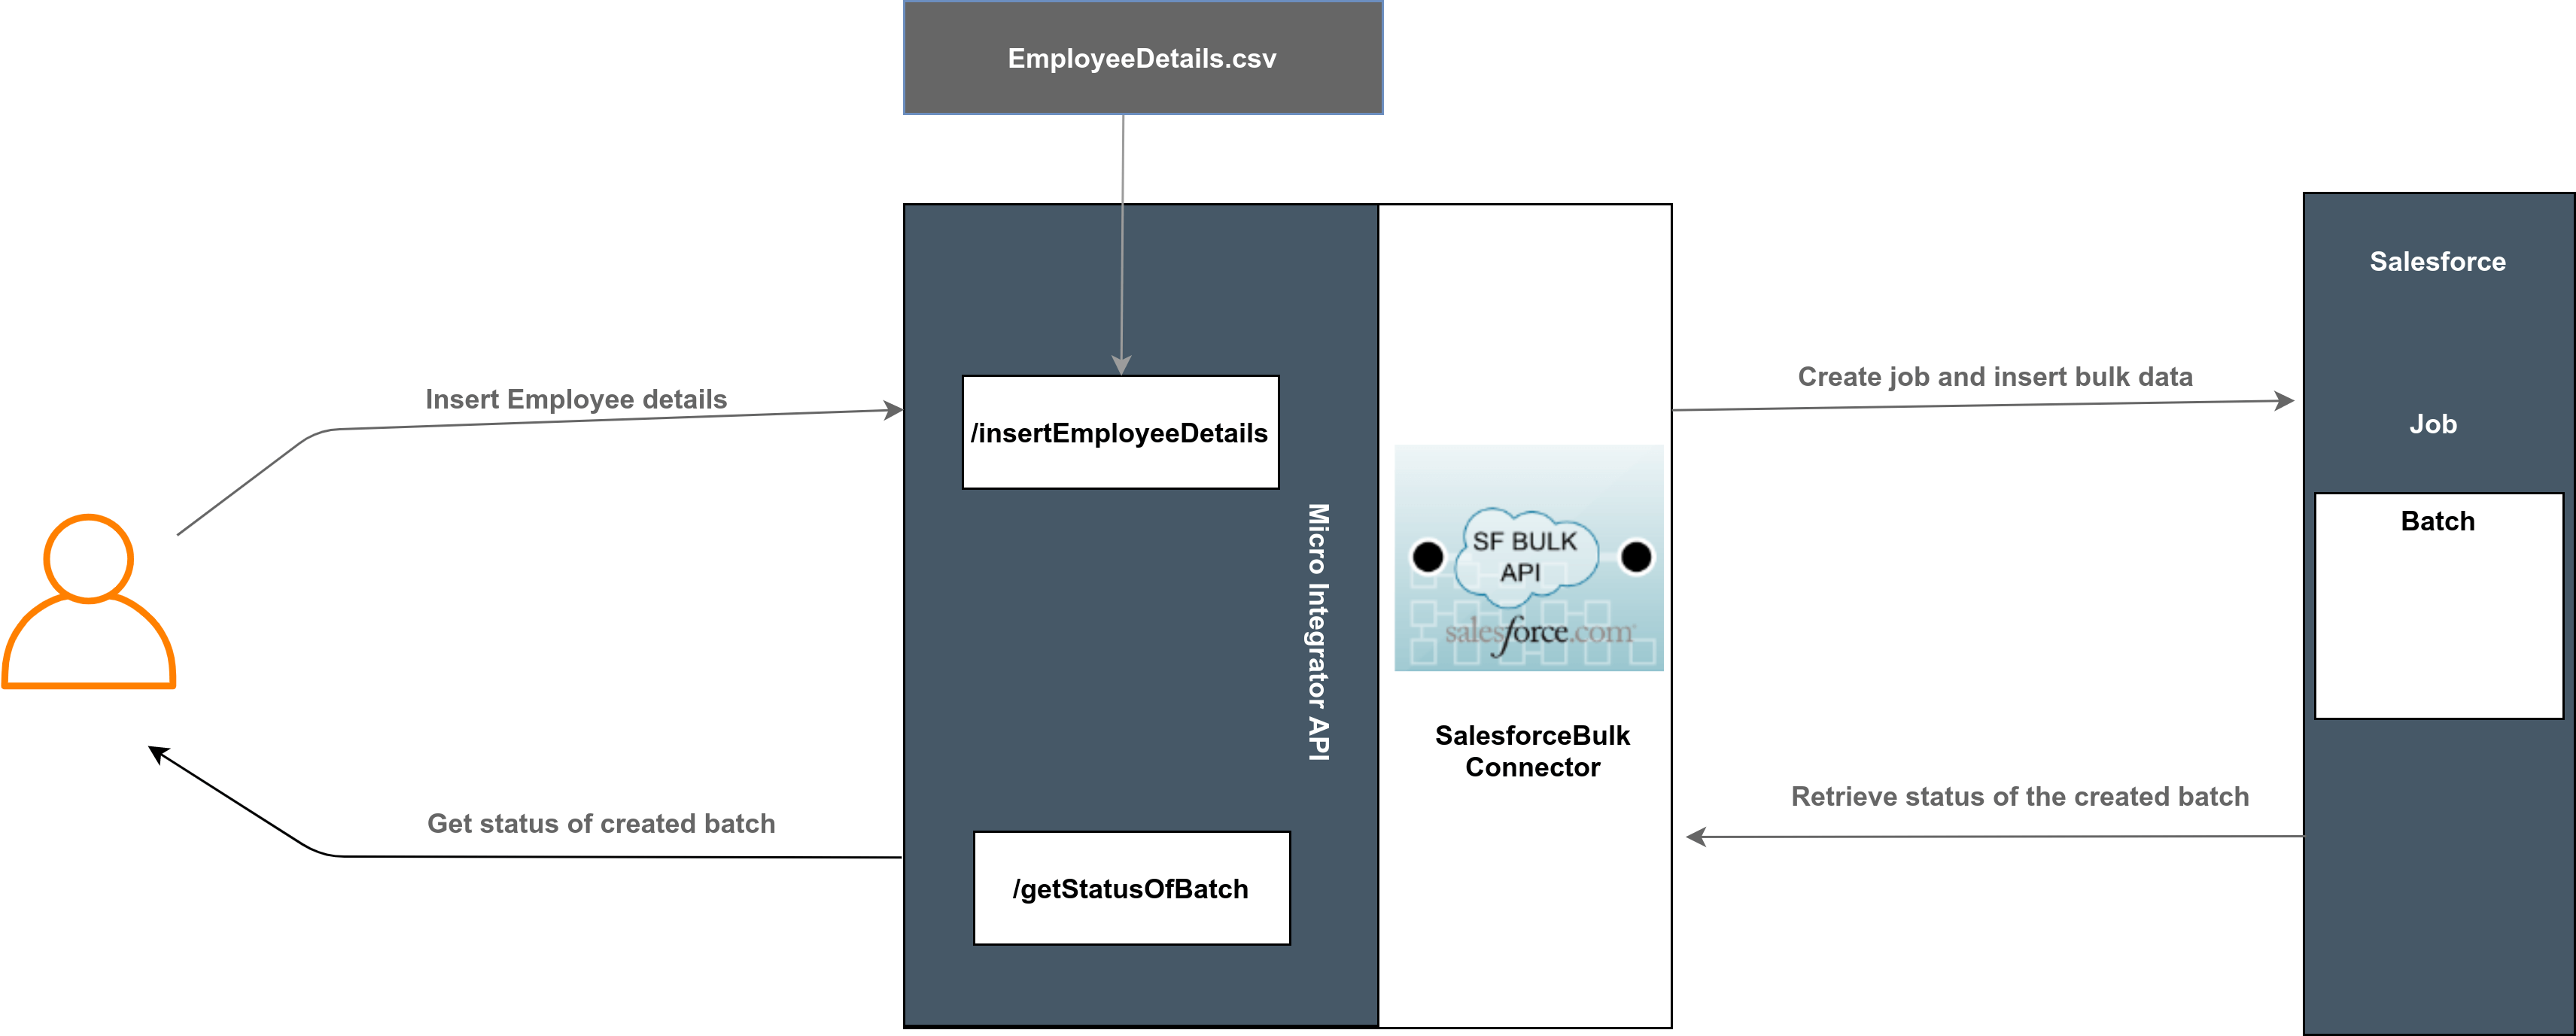
Both operations are exposed via an API. The API with the context /resources has two resources.
/insertEmployeeDetails: Creating a new job in the Salesforce account and insert employee details./getStatusOfBatch: Retrieve status about the created batch from the Salesforce account.
In this example, the user sends the request to invoke an API to insert employee details in bulk to the Salesforce account. When invoking the insertEmployeeDetails resource, it creates a new job based on the properties that you specify. Read the CSV data file by using the WSO2 File Connector and the extracted dataset is inserted as a batch. Afterwards it responds according to the specified template and is sent back to the client. Finally a user can retrieve the batch status using the getStatusOfBatch resource.
If you do not want to configure this yourself, you can simply get the project and run it.
Configure the connector in WSO2 Integration Studio
Connectors can be added to integration flows in WSO2 Integration Studio. Once added, the operations of the connector can be dragged onto your canvas and added to your sequences.
Import the connector
Follow these steps to set up the Integration Project and the Connector Exporter Project.
-
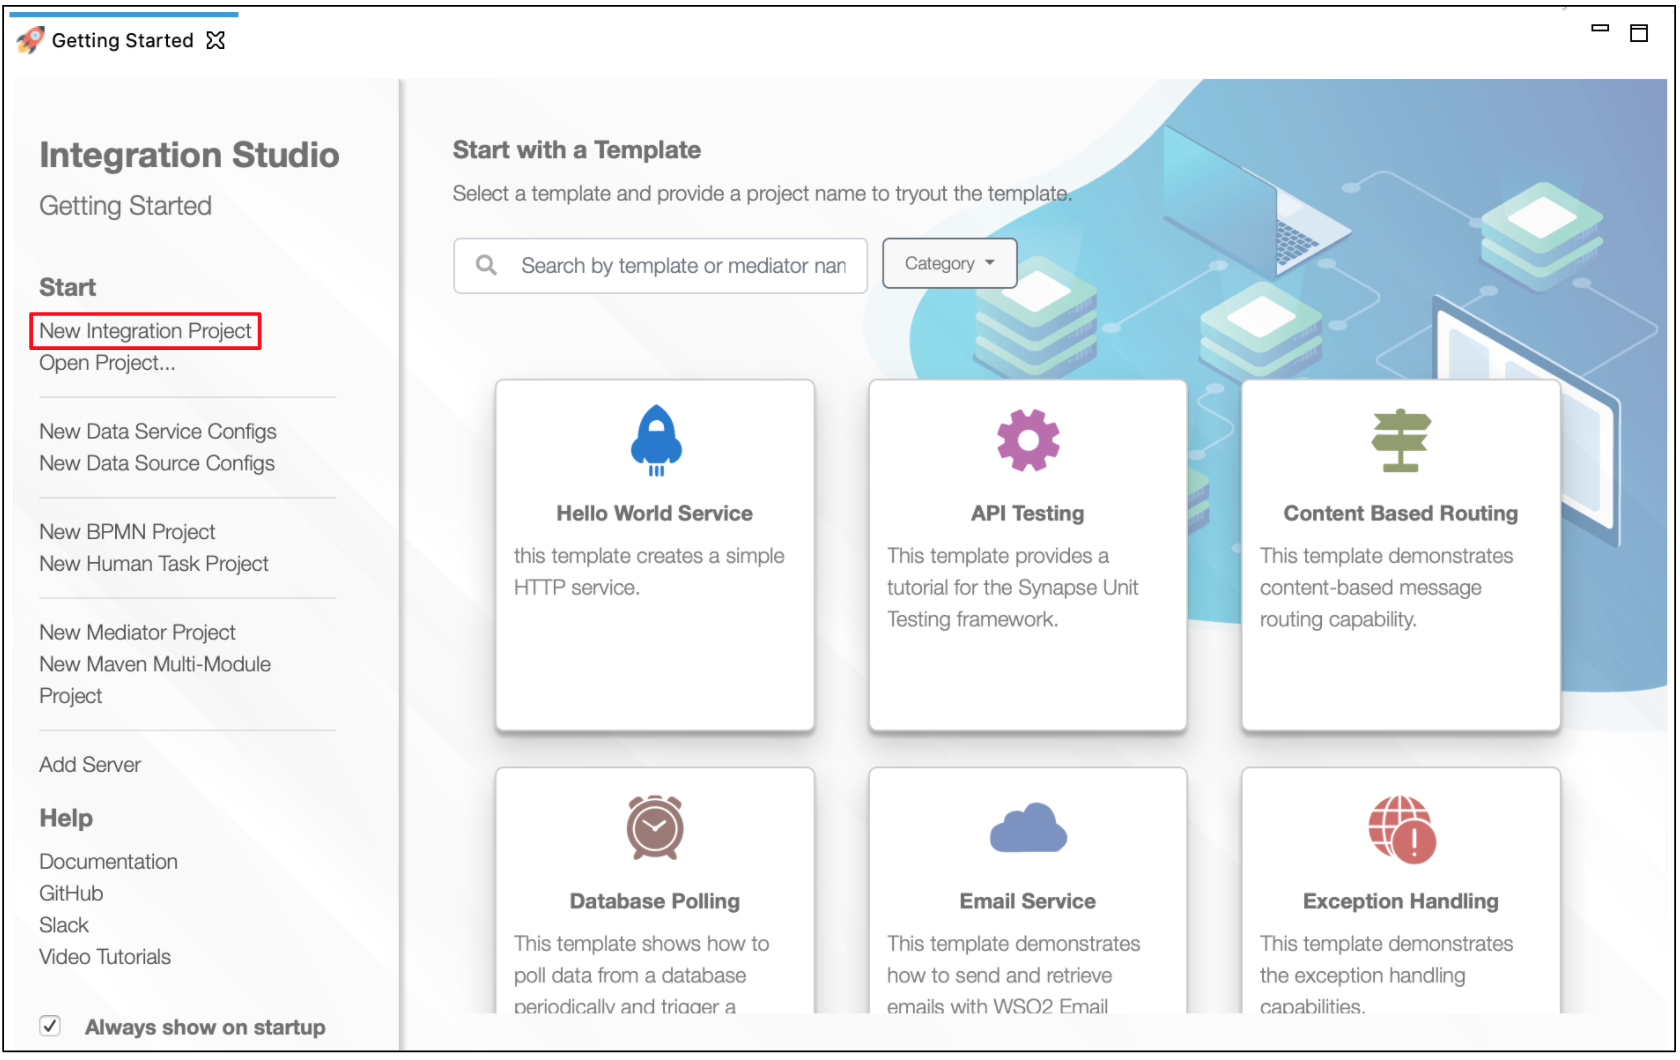
Open WSO2 Integration Studio and select New Integration Project to create an Integration Project.
-
Right-click the project that you created and click on Add or Remove Connector -> Add Connector. You will get directed to the WSO2 Connector Store.
-
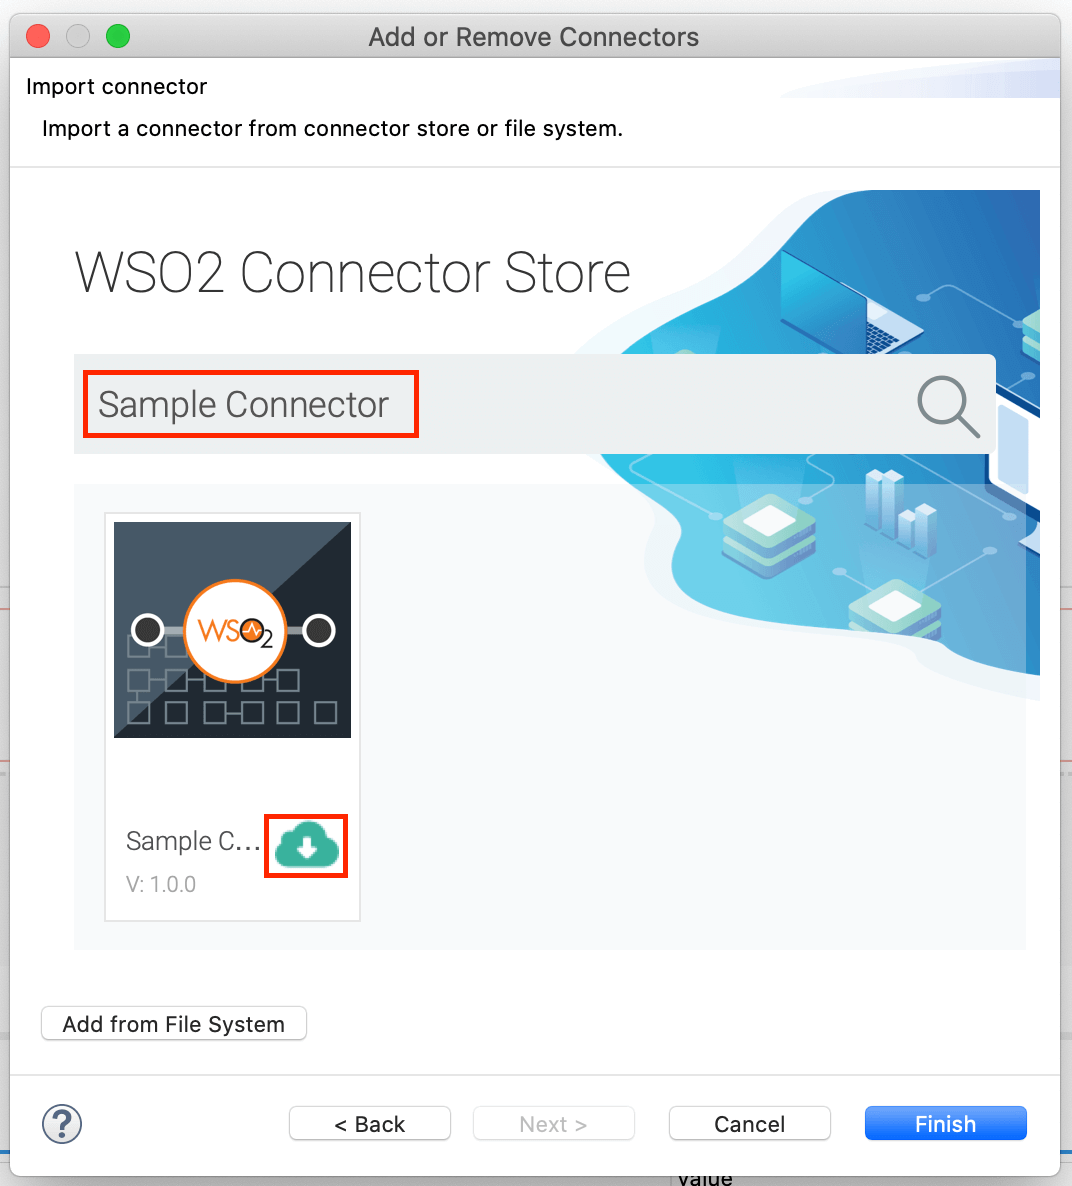
Search for the specific connector required for your integration scenario and download it to the workspace.
-
Click Finish, and your Integration Project is ready. The downloaded connector is displayed on the side palette with its operations.
-
You can drag and drop the operations to the design canvas and build your integration logic.

-
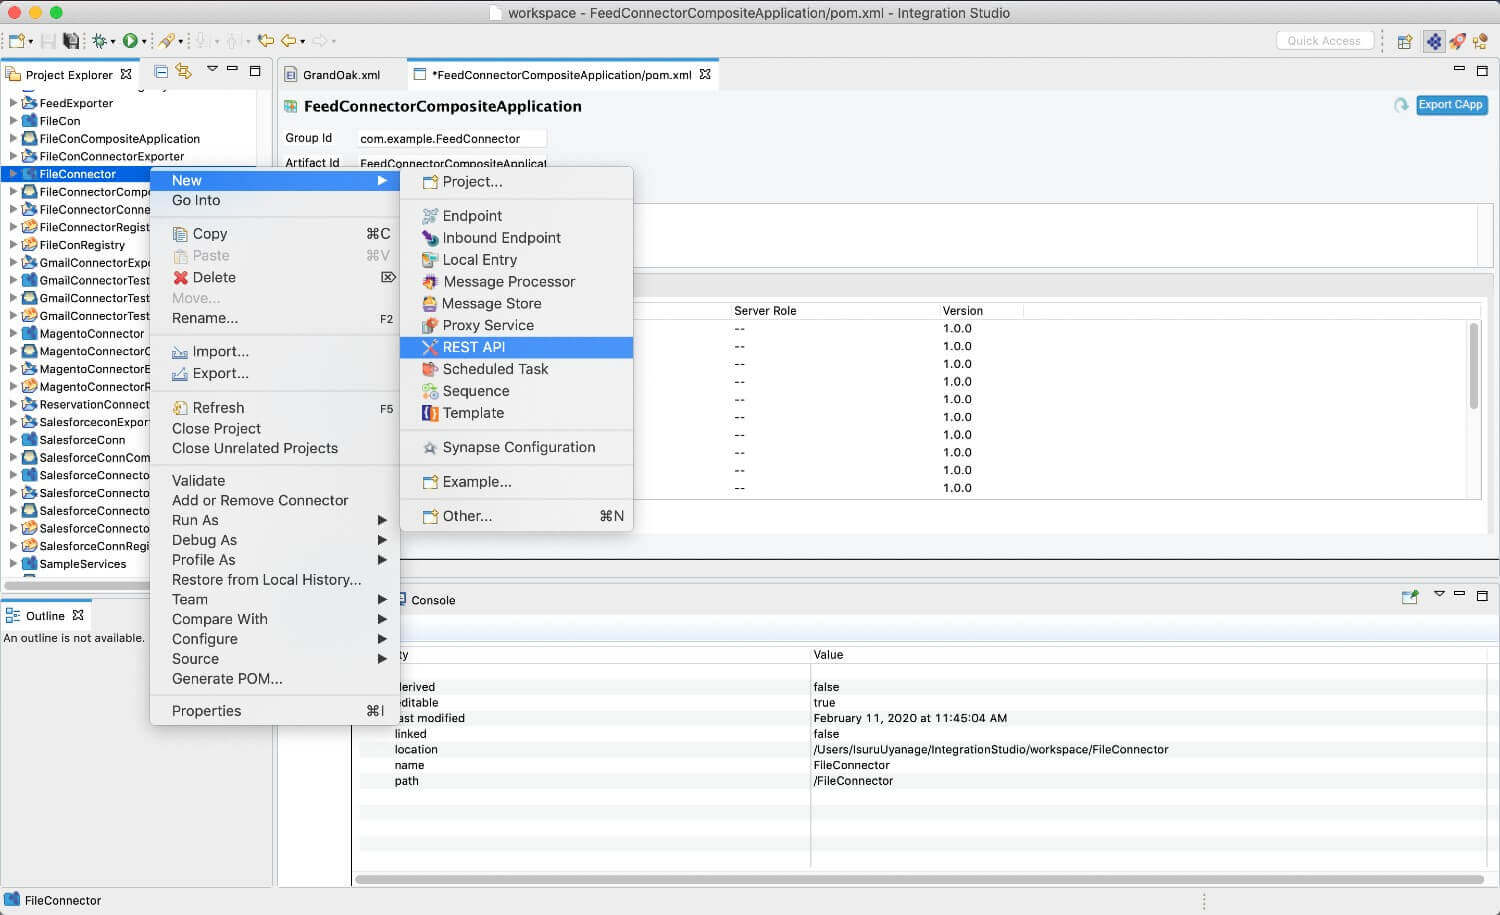
Right click on the created Integration Project and select New -> Rest API to create the REST API.
Add integration logic
First create an API, which will be where we configure the integration logic. Right click on the created Integration Project and select, New -> Rest API to create the REST API. Specify the API name as Salesforcebulk-API and API context as /salesforce.
Configure a resource for the insertEmployeeBulkRecords
Now follow the steps below to add configurations to the insertEmployeeBulkRecords resource.
-
Initialize the connector.
-
Follow these steps to generate the Access Tokens for Salesforce and obtain the Client Id, Client Secret, Access Token, and Refresh Token.
-
Navigate into the Palette pane and select the graphical operations icons listed under Salesforcebulk Connector section. Then drag and drop the
initoperation into the Design pane.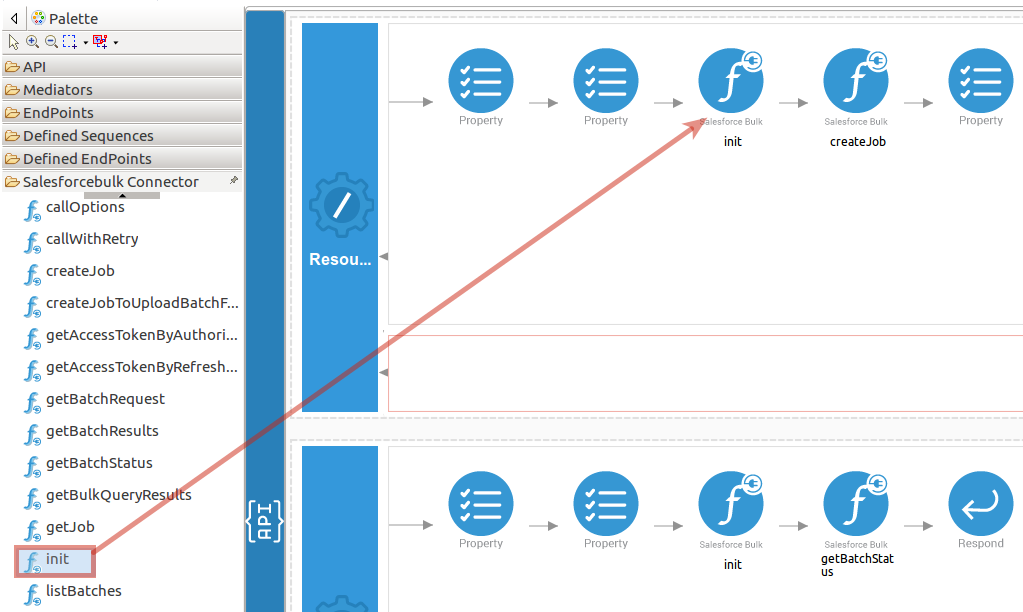
-
Add the property values into the
initoperation as shown below. Replace theclientSecret,clientId,accessToken,refreshTokenwith obtained values from above steps.- clientSecret : Value of your client secret given when you registered your application with Salesforce.
- clientId : Value of your client ID given when you registered your application with Salesforce.
- accessToken : Value of the access token to access the API via request.
- refreshToken : Value of the refresh token.
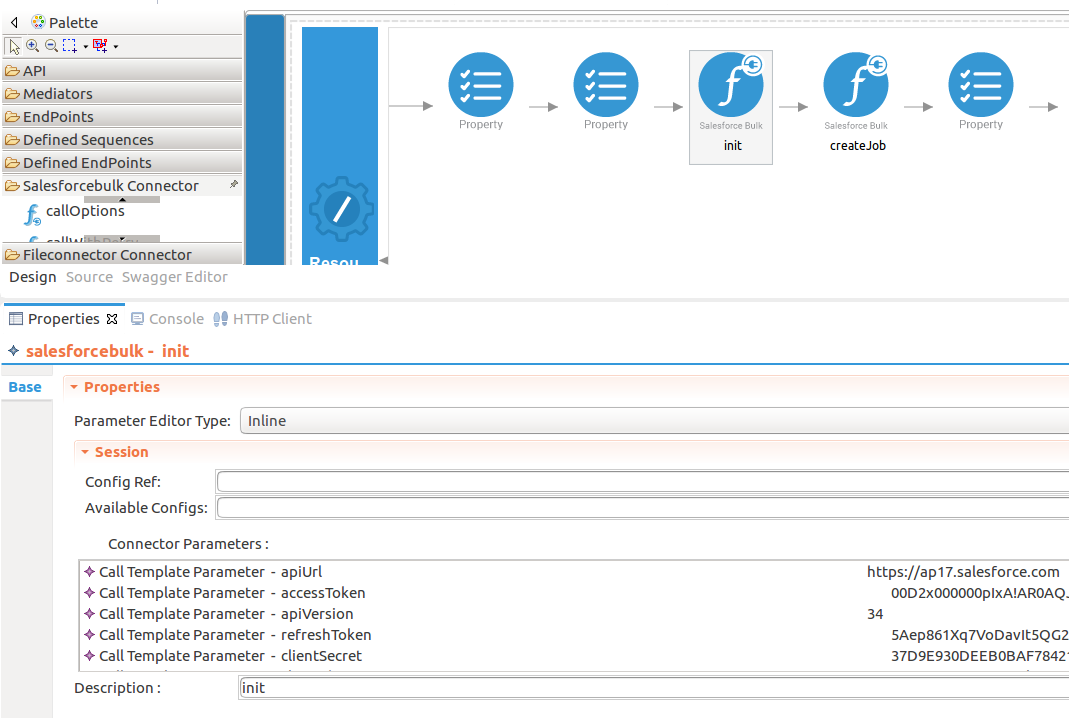
-
-
Set up the
createJoboperation.-
Setup the
createJobconfigurations. In this operation we are going to create a job in the Salesforce account. Please find thecreateJoboperation parameters listed here.- operation : The processing operation that the job should perform.
- object : The object type of data that is to be processed by the job.
- contentType : The content type of the job.
While invoking the API, the above
objectparameter value comes as a user input. -
Navigate into the Palette pane and select the graphical operations icons listed under Salesforcebulk Connector section. Then drag and drop the
createJoboperation into the Design pane.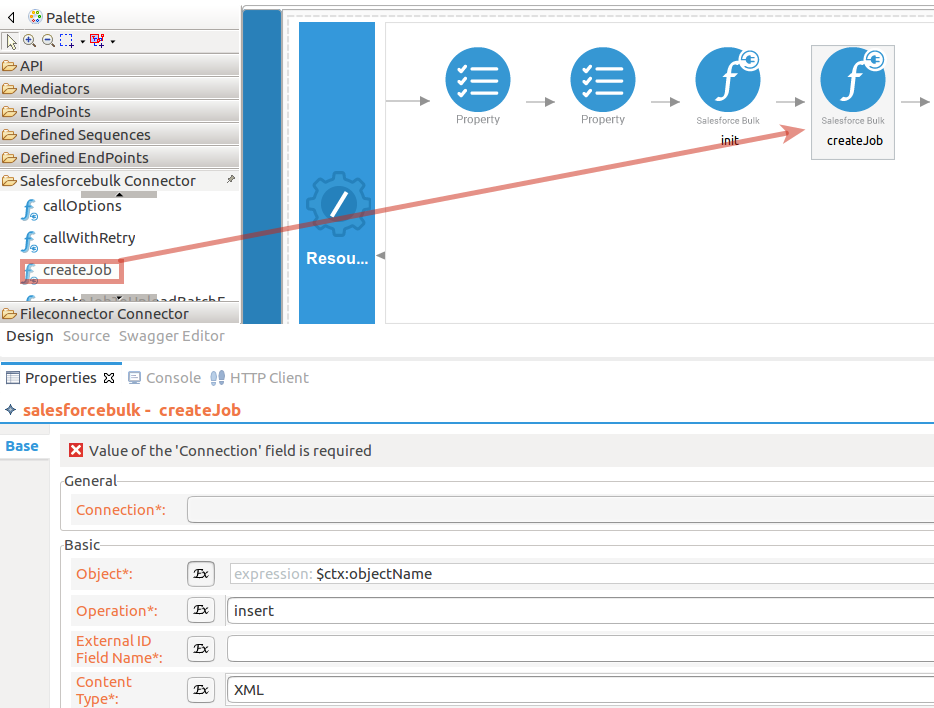
-
To get the input values into the API, we can use the property mediator. Navigate into the Palette pane and select the graphical mediators icons listed under Mediators section. Then drag and drop the
Propertymediators into the Design pane as shown below.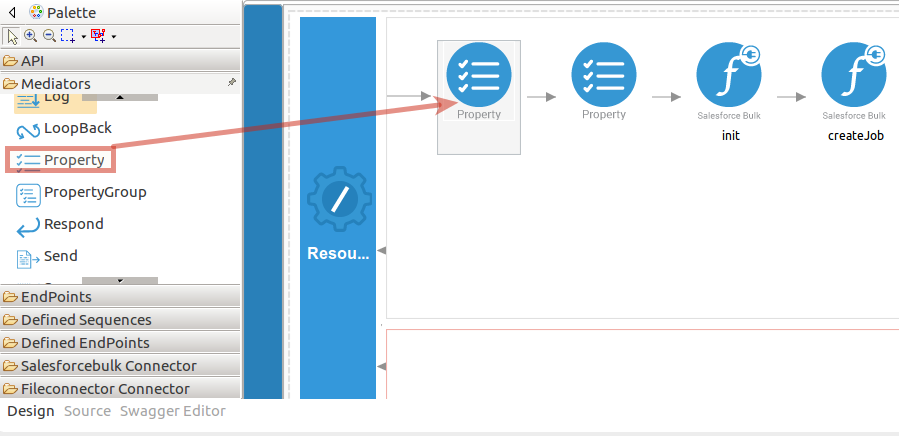
The parameters available for configuring the Property mediator are as follows:
Note: The properties should be added to the palette before creating the operation.
-
Add the property mediator to capture the
objectNamevalue. This is the object type of data that is to be processed by the job.- name : objectName
- expression : //object/text()
- type : STRING
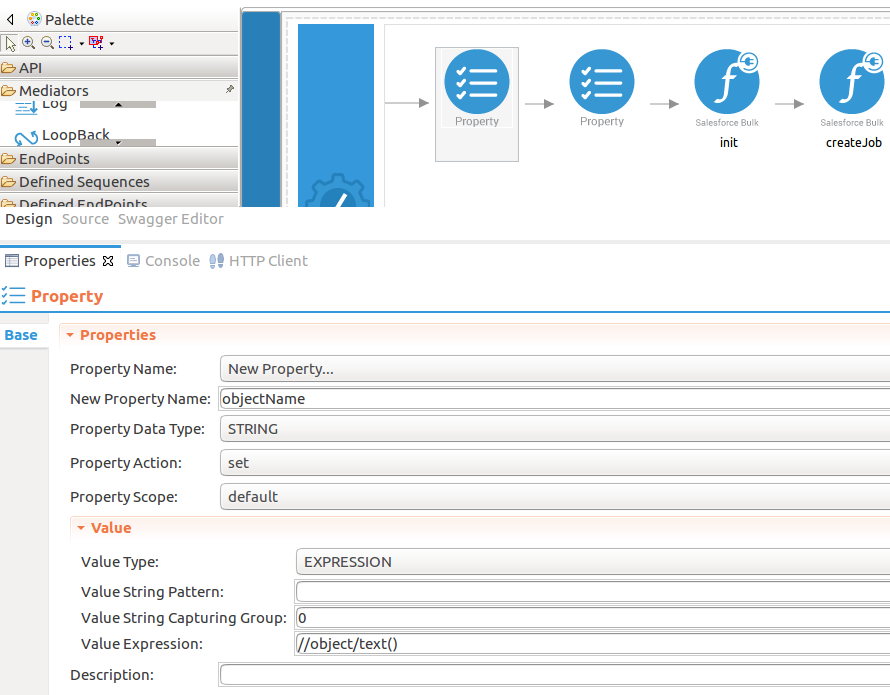
-
-
Set up the fileconnector operation.
-
Setup the
fileconnector.readconfigurations. In this operation we are going to read the CSV file content by using the WSO2 File Connector.- contentType : Content type of the files processed by the connector.
- source : The location of the file. This can be a file on the local physical file system or a file on an FTP server.
- filePattern : The pattern of the file to be read.
While invoking the API, the above
sourceparameter value come as a user input.Note: When you configuring this
sourceparameter in Windows operating system you need to set this property shown bellow<source>C:\\Users\Kasun\Desktop\Salesforcebulk-connector\SFBulk.csv</source>. -
Navigate into the Palette pane and select the graphical operations icons listed under Fileconnector Connector section. Then drag and drop the
readoperation into the Design pane.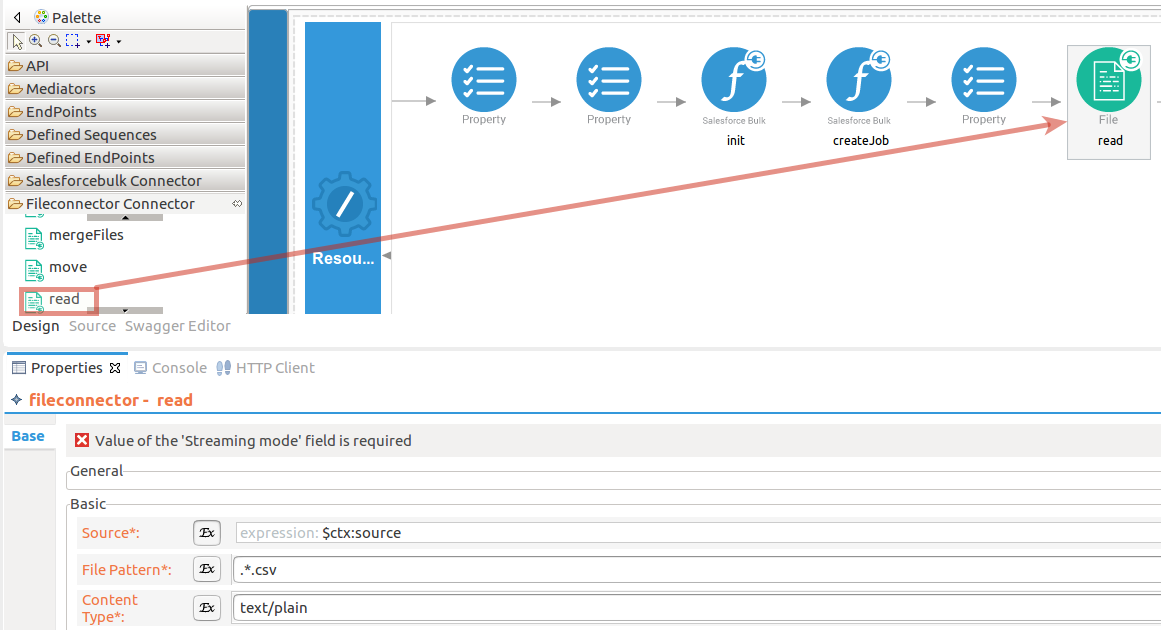
-
To get the input values in to the API we can use the property mediator. Navigate into the Palette pane and select the graphical mediators icons listed under Mediators section. Then drag and drop the
Propertymediators into the Design pane as steps given in section 2.3 thecreateJoboperation. . -
Add the property mediator to capture the
sourcevalue. The source is location of the file. This can be a file on the local physical file system or a file on an FTP server.- name : source
- expression : //source/text()
- type : STRING
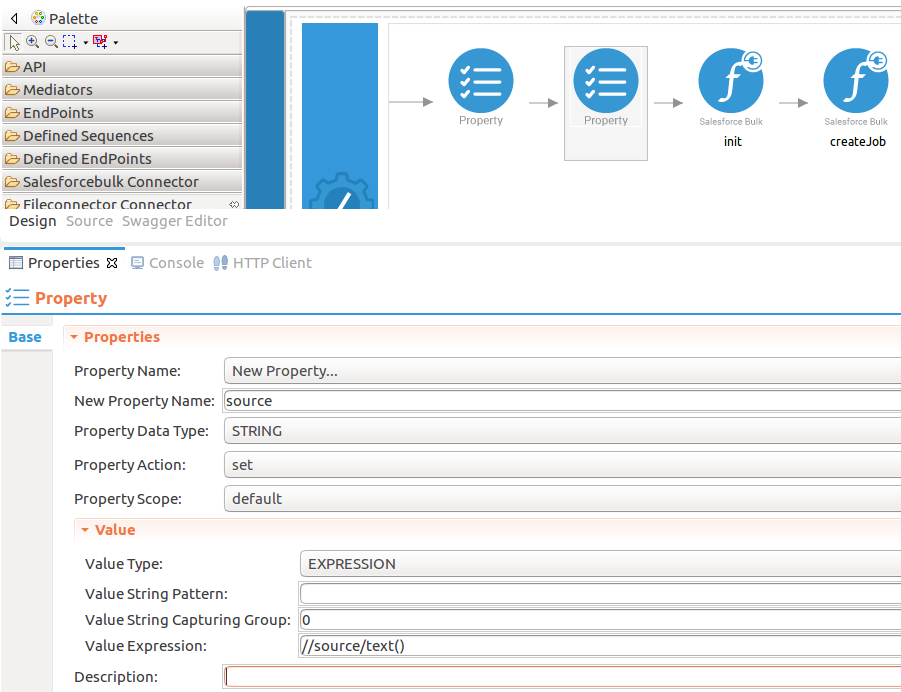
-
-
Set up the addBatch operation.
-
Initialize the connector. Please follow the steps given in section 1 in the
createJoboperation. -
Navigate into the Palette pane and select the graphical operations icons listed under Salesforcebulk Connector section. Then drag and drop the
addBatchoperation into the Design pane.- objects : A list of records to process.
- jobId : The unique identifier of the job to which you want add a new batch.
- isQuery : Set to true if the operation is query.
- contentType : The content type of the batch data. The content type you specify should be compatible with the content type of the associated job. Possible values are application/xml and text/csv.
While invoking the API, the above
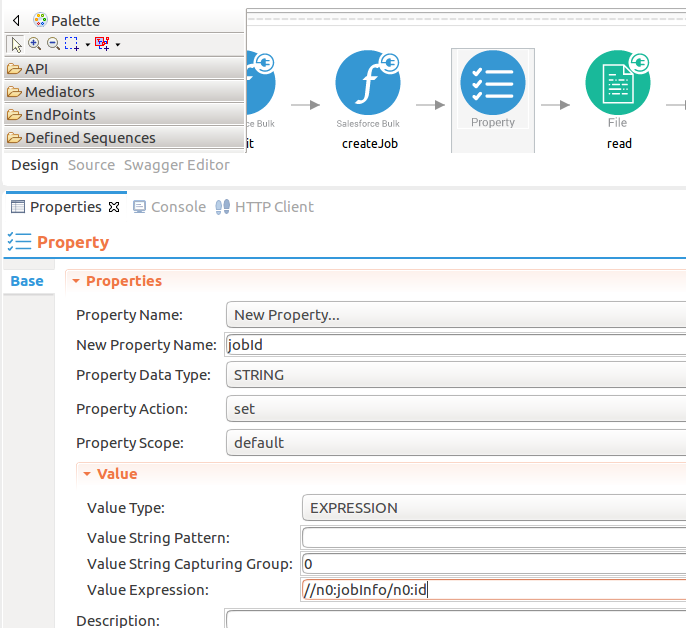
jobIdandobjectsparameters values come as a user input. Using a property mediator will extract thejobIdfrom thecreateJobresponse and store it into a configuredaddBatchoperation.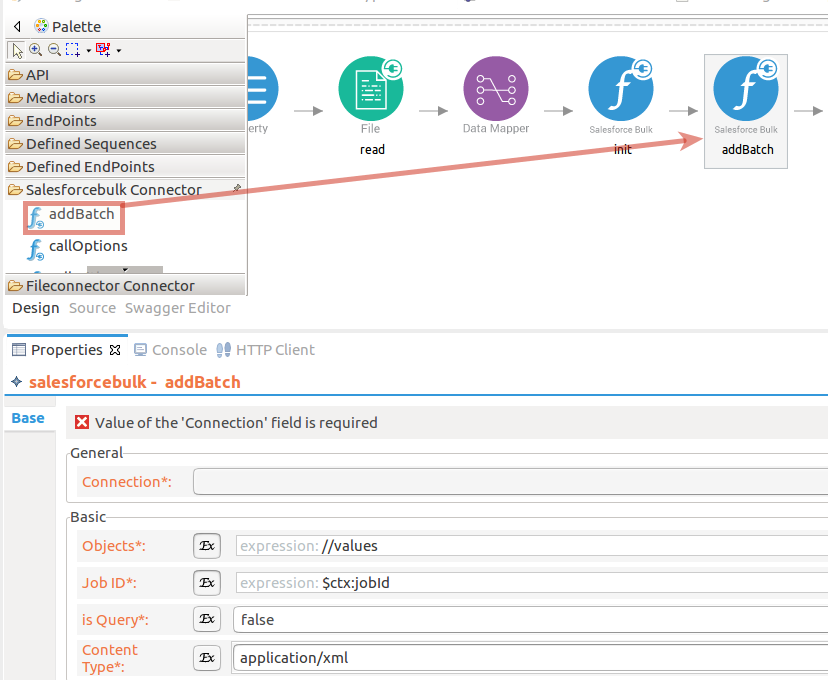
-
To get the input values in to the API we can use the property mediator. Navigate into the Palette pane and select the graphical mediators icons listed under Mediators section. Then drag and drop the
Propertymediators into the Design pane as steps given in section 2.3 thecreateJoboperation. . -
Add the property mediator to capture the
jobIdvalue.- name : jobId
- expression : //n0:jobInfo/n0:id
- type : STRING
-
To extract the
objectsfrom the file read operation, we used data mapper. It will grab the CSV file content and insert in to theaddBatchoperation.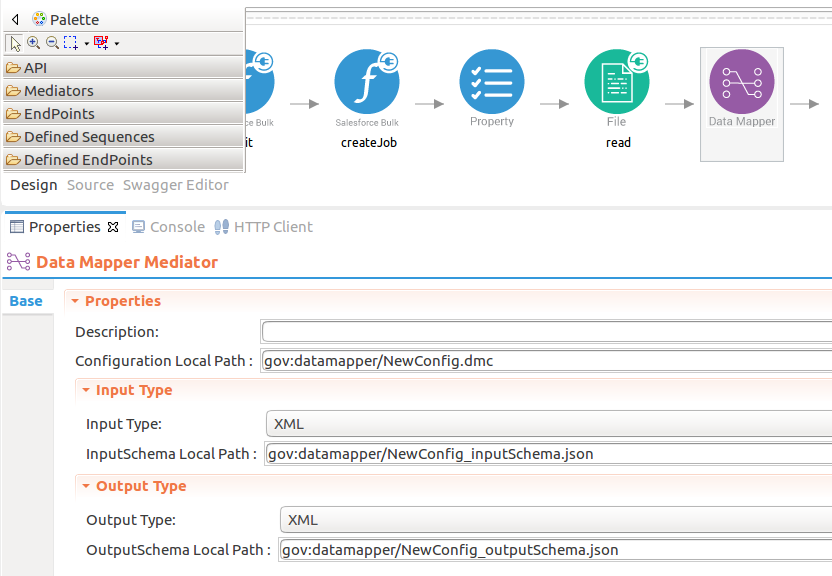
-
-
Forward the backend response to the API caller.
When you are invoking the created resource, the request of the message is going through the
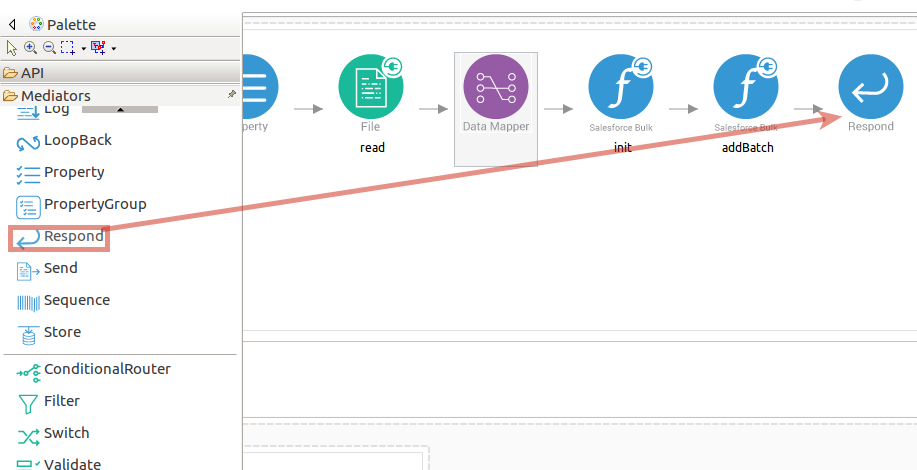
/insertEmployeeBulkRecordsresource. Finally, it is passed to the Respond mediator. The Respond Mediator stops the processing on the current message and sends the message back to the client as a response.-
Drag and drop respond mediator to the Design view.
-
Configure a resource for the getStatusOfBatch
-
Initialize the connector.
You can use the generated tokens to initialize the connector. Please follow the steps given in insertEmployeeBulkRecords section 1 for setting up the
initoperation. -
Set up the getBatchStatus operation.
-
To retrieve created batch status from the added batches in the Salesforce account, you need to add the
getBatchStatusoperation. -
Navigate into the Palette pane and select the graphical operations icons listed under Salesforce Connector section. Then drag and drop the
getBatchStatusoperations into the Design pane.- jobId : The unique identifier of the job to which the batch you specify belongs.
- batchId : The unique identifier of the batch for which you want to retrieve the status.
While invoking the API, the above
jobIdandbatchIdparameters values come as a user input.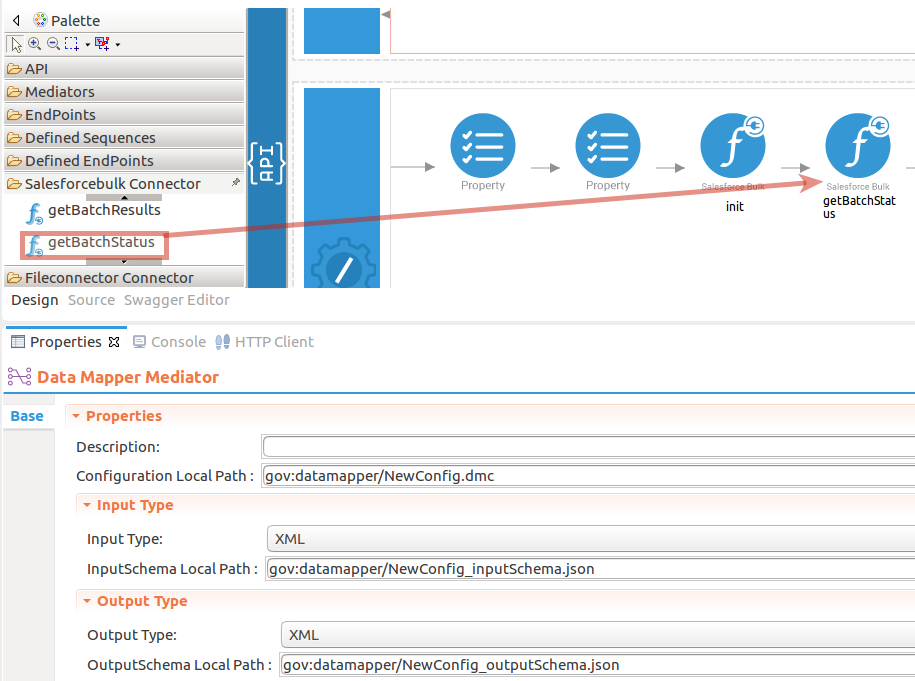
-
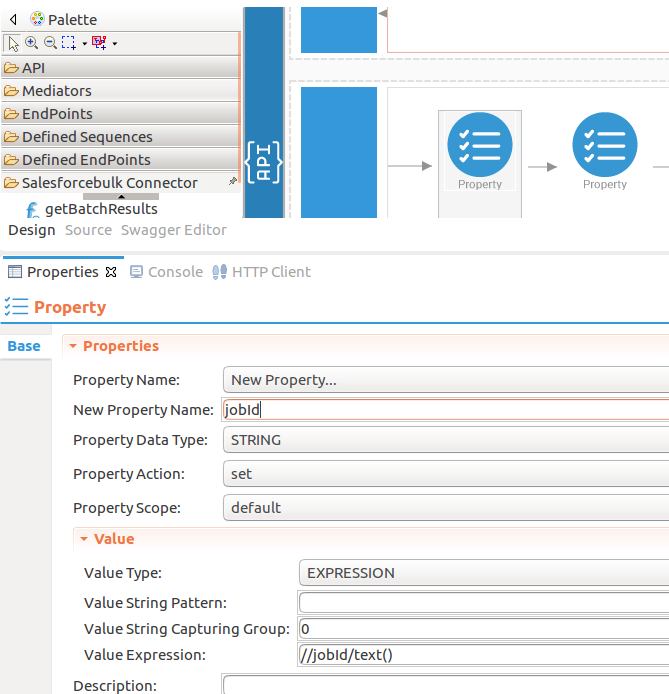
Add the property mediator to capture the
jobIdvalue.- name : jobId
- expression : //jobId/text()
- type : STRING
-
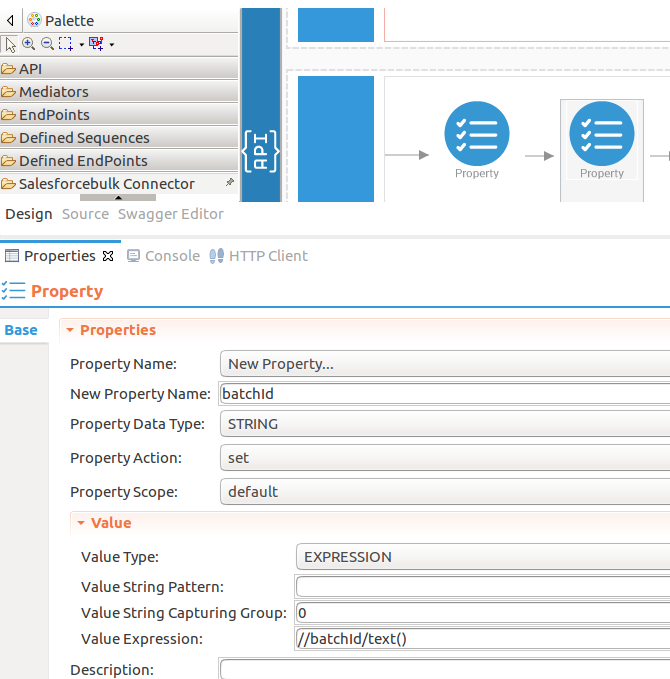
Add the property mediator to capture the
batchIdvalue.- name : batchId
- expression : //batchId/text()
- type : STRING
-
-
Forward the backend response to the API caller.
When you are invoking the created resource, the request of the message is going through the
/insertEmployeeBulkRecordsresource. Finally, it is passed to the Respond mediator. The Respond Mediator stops the processing on the current message and sends the message back to the client as a response.-
Drag and drop respond mediator to the Design view.
Now you can switch into the Source view and check the XML configuration files of the created API and sequences.
create.xml
  <?xml version="1.0" encoding="UTF-8"?>
         <api context="/salesforce" name="Salesforcebulk-API" xmlns="http://ws.apache.org/ns/synapse">
             <resource methods="POST" url-mapping="/insertEmployeeBulkRecords">
                 <inSequence>
                     <property expression="//object/text()" name="objectName" scope="default" type="STRING"/>
                     <property expression="//source/text()" name="source" scope="default" type="STRING"/>
                     <salesforcebulk.init>
                         <apiUrl>https://ap17.salesforce.com</apiUrl>
                         <accessToken>00D2x000000pIxA!AR0AQJxgll8UgZqaocCP_U516yo.bpzV19USOFzw4tFsvjbdE6x_ccIKrZgQXLQesOt_VX6FeuSrGq_VxyLdrjvryqh8EBas</accessToken>
                         <apiVersion>34</apiVersion>
                         <refreshToken>5Aep861Xq7VoDavIt5QG2vWIHGbv.B1Q.4rMXb9o3DFmhvbChN3tF24fOGHvUcOU2iMWSF06w5bWFjmHgu0bA5s</refreshToken>
                         <clientSecret>37D9E930DEEB0BAF7842124352065F6DB2D90219D9DB06238978590665EDEFEC</clientSecret>
                         <clientId>3MVG97quAmFZJfVyr_k_q7IC1iEc71lap9m4ayJWpUrkVe85mnF0GNjsIu2G4__FGC4NOzS.3o10Eh_H81xX8</clientId>
                     </salesforcebulk.init>
                     <salesforcebulk.createJob>
                         <operation>insert</operation>
                         <object>{$ctx:objectName}</object>
                         <contentType>XML</contentType>
                     </salesforcebulk.createJob>
                     <property expression="//n0:jobInfo/n0:id" name="jobId" scope="default" type="STRING" xmlns:n0="http://www.force.com/2009/06/asyncapi/dataload"/>
                     <fileconnector.read>
                         <source>{$ctx:source}</source>
                         <contentType>text/plain</contentType>
                         <filePattern>.*.csv</filePattern>
                     </fileconnector.read>
                     <datamapper config="gov:datamapper/NewConfig.dmc" inputSchema="gov:datamapper/NewConfig_inputSchema.json" inputType="XML" outputSchema="gov:datamapper/NewConfig_outputSchema.json" outputType="XML" xsltStyleSheet="gov:datamapper/NewConfig_xsltStyleSheet.xml"/>
                     <salesforcebulk.init>
                         <apiUrl>https://ap17.salesforce.com</apiUrl>
                         <accessToken>00D2x000000pIxA!AR0AQJxgll8UgZqaocCP_U516yo.bpzV19USOFzw4tFsvjbdE6x_ccIKrZgQXLQesOt_VX6FeuSrGq_VxyLdrjvryqh8EBas</accessToken>
                         <apiVersion>34</apiVersion>
                         <refreshToken>5Aep861Xq7VoDavIt5QG2vWIHGbv.B1Q.4rMXb9o3DFmhvbChN3tF24fOGHvUcOU2iMWSF06w5bWFjmHgu0bA5s</refreshToken>
                         <clientSecret>37D9E930DEEB0BAF7842124352065F6DB2D90219D9DB06238978590665EDEFEC</clientSecret>
                         <clientId>3MVG97quAmFZJfVyr_k_q7IC1iEc71lap9m4ayJWpUrkVe85mnF0GNjsIu2G4__FGC4NOzS.3o10Eh_H81xX8</clientId>
                     </salesforcebulk.init>
                     <salesforcebulk.addBatch>
                         <objects>{//values}</objects>
                         <jobId>{$ctx:jobId}</jobId>
                         <isQuery>false</isQuery>
                         <contentType>application/xml</contentType>
                     </salesforcebulk.addBatch>
                     <respond/>
                 </inSequence>
                 <outSequence/>
                 <faultSequence/>
             </resource>
             <resource methods="POST" url-mapping="/getStatusOfBatch">
                 <inSequence>
                     <property expression="//jobId/text()" name="jobId" scope="default" type="STRING"/>
                     <property expression="//batchId/text()" name="batchId" scope="default" type="STRING"/>
                     <salesforcebulk.init>
                         <apiUrl>https://ap17.salesforce.com</apiUrl>
                         <accessToken>00D2x000000pIxA!AR0AQJxgll8UgZqaocCP_U516yo.bpzV19USOFzw4tFsvjbdE6x_ccIKrZgQXLQesOt_VX6FeuSrGq_VxyLdrjvryqh8EBas</accessToken>
                         <apiVersion>34</apiVersion>
                         <refreshToken>5Aep861Xq7VoDavIt5QG2vWIHGbv.B1Q.4rMXb9o3DFmhvbChN3tF24fOGHvUcOU2iMWSF06w5bWFjmHgu0bA5s</refreshToken>
                         <clientSecret>37D9E930DEEB0BAF7842124352065F6DB2D90219D9DB06238978590665EDEFEC</clientSecret>
                         <clientId>3MVG97quAmFZJfVyr_k_q7IC1iEc71lap9m4ayJWpUrkVe85mnF0GNjsIu2G4__FGC4NOzS.3o10Eh_H81xX8</clientId>
                     </salesforcebulk.init>
                     <salesforcebulk.getBatchStatus>
                         <jobId>{$ctx:jobId}</jobId>
                         <batchId>{$ctx:batchId}</batchId>
                     </salesforcebulk.getBatchStatus>
                     <respond/>
                 </inSequence>
                 <outSequence/>
                 <faultSequence/>
             </resource>
         </api>
-
Get the project
You can download the ZIP file and extract the contents to get the project code.
Tip
You may need to update the value of the access token and make other such changes before deploying and running this project.
Deployment
Follow these steps to deploy the exported CApp in the integration runtime.
Deploying on Micro Integrator
You can copy the composite application to the <PRODUCT-HOME>/repository/deployment/server/carbonapps folder and start the server. Micro Integrator will be started and the composite application will be deployed.
You can further refer the application deployed through the CLI tool. See the instructions on managing integrations from the CLI.
Click here for instructions on deploying on WSO2 Enterprise Integrator 6
-
You can copy the composite application to the
<PRODUCT-HOME>/repository/deployment/server/carbonappsfolder and start the server. -
WSO2 EI server starts and you can login to the Management Console https://localhost:9443/carbon/ URL. Provide login credentials. The default credentials will be admin/admin.
-
You can see that the API is deployed under the API section.
Testing
Invoke the API as shown below using the curl command. Curl application can be downloaded from here.
-
Creating a new job in the in the Salesforce account and insert employee details.
Sample request
curl -v POST -d <inserRecord><object>Account</object><source>/home/kasun/Documents/SFbulk.csv</source></inserRecord> "http://localhost:8290/salesforce/insertEmployeeBulkRecords" -H "Content-Type:application/xml"Expected Response
<?xml version="1.0" encoding="UTF-8"?> <batchInfo xmlns="http://www.force.com/2009/06/asyncapi/dataload"> <id>7512x000002ywZNAAY</id> <jobId>7502x000002ypCDAAY</jobId> <state>Queued</state> <createdDate>2020-07-16T06:41:53.000Z</createdDate> <systemModstamp>2020-07-16T06:41:53.000Z</systemModstamp> <numberRecordsProcessed>2</numberRecordsProcessed> <numberRecordsFailed>2</numberRecordsFailed> <totalProcessingTime>93</totalProcessingTime> <apiActiveProcessingTime>2</apiActiveProcessingTime> <apexProcessingTime>0</apexProcessingTime> </batchInfo> -
Get status of the inserted employee details.
Sample request
curl -v POST -d <getBatchStatus><jobId>7502x000002yp73AAA</jobId><batchId>7512x000002ywWrAAI</batchId></getBatchStatus> "http://localhost:8290/resources/getStatusOfBatch" -H "Content-Type:application/xml"Expected Response
 <?xml version="1.0" encoding="UTF-8"?>
 <batchInfo
   xmlns="http://www.force.com/2009/06/asyncapi/dataload">
    <id>7512x000002ywWrAAI</id>
    <jobId>7502x000002yp73AAA</jobId>
    <state>Failed</state>
    <stateMessage>InvalidBatch : Records not found</stateMessage>
    <createdDate>2020-07-16T06:14:36.000Z</createdDate>
    <systemModstamp>2020-07-16T06:14:37.000Z</systemModstamp>
    <numberRecordsProcessed>2</numberRecordsProcessed>
    <numberRecordsFailed>0</numberRecordsFailed>
    <totalProcessingTime>93</totalProcessingTime>
    <apiActiveProcessingTime>3</apiActiveProcessingTime>
    <apexProcessingTime>0</apexProcessingTime>
 </batchInfo>
What's Next
- To customize this example for your own scenario, see Salesforce bulk Connector Configuration documentation for all operation details of the connector.
