Creating a New Connector
You can write a new connector for a specific requirement that cannot be addressed via any of the existing connectors that can be downloaded from the connector store.
Follow the steps given below to write a new connector to integrate with the Google Books service. You can then use the connector inside a mediation sequence to connect with Google Books and get information.
Writing a new connector
Follow the steps given below to write the new connector.
Prerequisites
Download and install Apache Maven.
Step 1: Creating the Maven project template
We will use the maven archetype to generate the Maven project template and sample connector code.
-
Open a terminal, navigate to the directory on your machine where you want the new connector to be created, and run the following command:
2. When prompted, enter a name for the connector. For example, googleBooks. 3. When prompted for confirmation, enter y.mvn org.apache.maven.plugins:maven-archetype-plugin:2.4:generate -DarchetypeGroupId=org.wso2.carbon.extension.archetype -DarchetypeArtifactId=org.wso2.carbon.extension.esb.connector-archetype -DarchetypeVersion=2.0.4 -DgroupId=org.wso2.carbon.esb.connector -DartifactId=org.wso2.carbon.esb.connector.googlebooks -Dversion=1.0.0 -DarchetypeRepository=http://maven.wso2.org/nexus/content/repositories/wso2-public/
The org.wso2.carbon.esb.connector.googlebooks directory is now created with a directory structure consisting of a pom.xml file, srctree, and repository tree.
Step 2: Adding the new connector resources
Now, let's configure files in the org.wso2.carbon.esb.connector.googlebooks/src/main/resources directory:
- Create a directory named googlebooks_volume in the
/src/main/resourcesdirectory. -
Create a file named
listVolume.xmlwith the following content in the googlebooks_volume directory:<template name="listVolume" xmlns="http://ws.apache.org/ns/synapse"> <parameter name="searchQuery" description="Full-text search query string." /> <sequence> <property name="uri.var.searchQuery" expression="$func:searchQuery" /> <call> <endpoint> <http method="get" uri-template="https://www.googleapis.com/books/v1/volumes?q={uri.var.searchQuery}" /> </endpoint> </call> </sequence> </template> -
Create a file named
component.xmlin the googlebooks_volume directory and add the following content:<?xml version="1.0" encoding="UTF-8"?> <component name="googlebooks_volume" type="synapse/template"> <subComponents> <component name="listVolume"> <file>listVolume.xml</file> <description>Lists volumes that satisfy the given query.</description> </component> </subComponents> </component> -
Edit the
connector.xmlfile in thesrc/main/resourcesdirectory and replace the contents with the following dependency:<?xml version="1.0" encoding="UTF-8"?> <connector> <component name="googleBooks" package="org.wso2.carbon.connector" > <dependency component="googlebooks_volume"/> <description>wso2 sample connector library</description> </component> </connector> -
Create a folder named icon in the
/src/main/resourcesdirectory and add two icons.Tip
You can download icons from the following location: icons
You are now ready to build the connector.
Step 3: Building the connector
Open a terminal, navigate to the org.wso2.carbon.esb.connector.googlebooks directory and execute the following maven command:
mvn clean install
This builds the connector and generates a ZIP file named googleBooks-connector-1.0.0.zip in the target directory.
Using the new connector
Now, let's look at how you can use the new connector in a mediation sequence.
Step 1: Adding the connector to your mediation sequence
- Set up WSO2 Integration Studio.
-
Create an ESB Config project and import the connector to your project.
Tip
Be sure to select the new
googleBooks-connector-1.0.0.zipfile from yourorg.wso2.carbon.esb.connector.googlebooks/targetdirectory. -
Create a custom proxy service named googlebooks_listVolume. In the Design View, you will note that the new connector is added to the tool palette.
-
Now, update the proxy service as shown below. You will be defining a mediation logic using the Property mediator, the new googleBooks connector, and the Respond mediator:
<?xml version="1.0" encoding="UTF-8"?>
<proxy xmlns="http://ws.apache.org/ns/synapse"
       name="googlebooks_listVolume"
       transports="https,http"
       statistics="disable"
       trace="disable"
       startOnLoad="true">
   <target>
      <inSequence>
         <property name="searchQuery" expression="json-eval($.searchQuery)"/>
         <googleBooks.listVolume>
            <searchQuery>{$ctx:searchQuery}</searchQuery>
         </googleBooks.listVolume>
         <respond/>
      </inSequence>
   </target>
   <description/>
</proxy>
Step 2: Packaging all the artifacts
You need to package the new connector file and the proxy service separately.
-
Create a Connector Exporter project and add the connector.
See the instructions on packaging a new connector file.
-
Create a new Composite Application project and add the proxy service as well as the connector as dependencies.
Tip
Note that you need to add both the Connector Exporter project as well as the ESB Config project as dependencies because the connector is referred from the proxy service.

See the instructions on packaging ESB artifacts.
Step 3: Deploying the artifacts
-
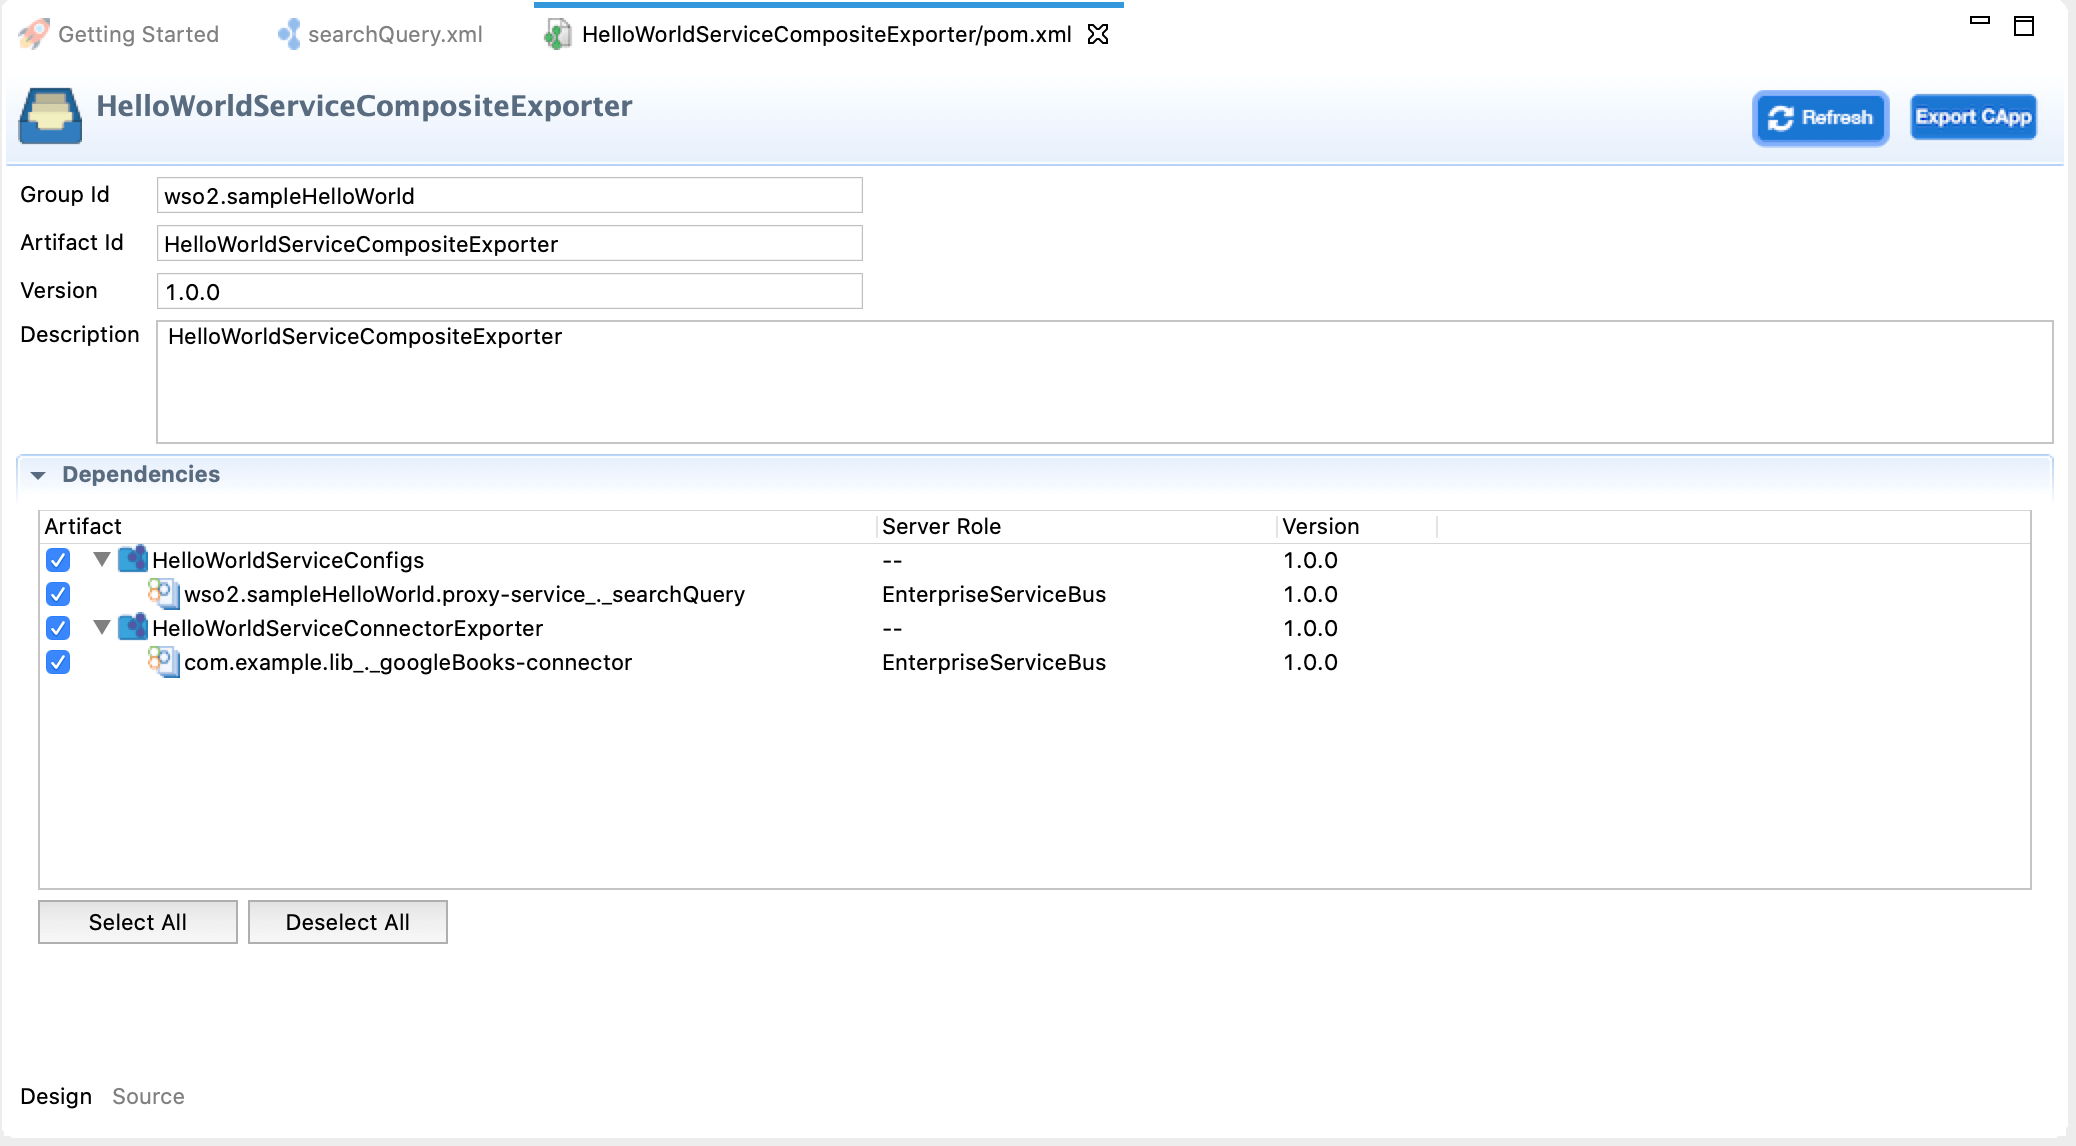
Open the POM file for the composite application project and ensure that the Connector Exporter project as well as the ESB Config project are selected as dependencies.

-
Right-click the Composite Application project and click Export Project Artifacts and Run.
The embedded Micro Integrator will now start and deploy the artifacts.
Step 4: Testing the connector
Post a request to the proxy service using Curl as shown below.
curl -v -X POST -d "{"searchQuery":"rabbit"}" -H "Content-Type: application/json" http://localhost:8290/services/googlebooks_listVolume
This performs a search and displays a list of volumes that meet the specified search criteria.