Routing Requests based on Message Content
What you'll build
In this tutorial, we are creating the mediation artifacts that can route a message to the relevant endpoint depending on the content of the message payload.
When the client sends the appointment reservation request to the Micro Integrator, the message payload of the request contains the name of the hospital where the appointment needs to be confirmed. The HTTP request method that is used for this is POST. Based on the hospital name sent in the request message, the Micro Integrator should route the appointment reservation to the relevant hospital's back-end service.
Concepts and artifacts used
- REST API
- HTTP Endpoint
- Property Mediator
- Call Mediator
Let's get started!
Step 1: Set up the workspace
Download the relevant WSO2 Integration Studio based on your operating system.
Step 2: Develop the integration artifacts
Follow the instructions given in this section to create and configure the required artifacts.
Create an Integration project
An Integration project is a maven multi module project, which will contain all the required modules for the integration solution.
- Open WSO2 Integration Studio.
-
Click New Integration Project in the Getting Started tab as shown below.
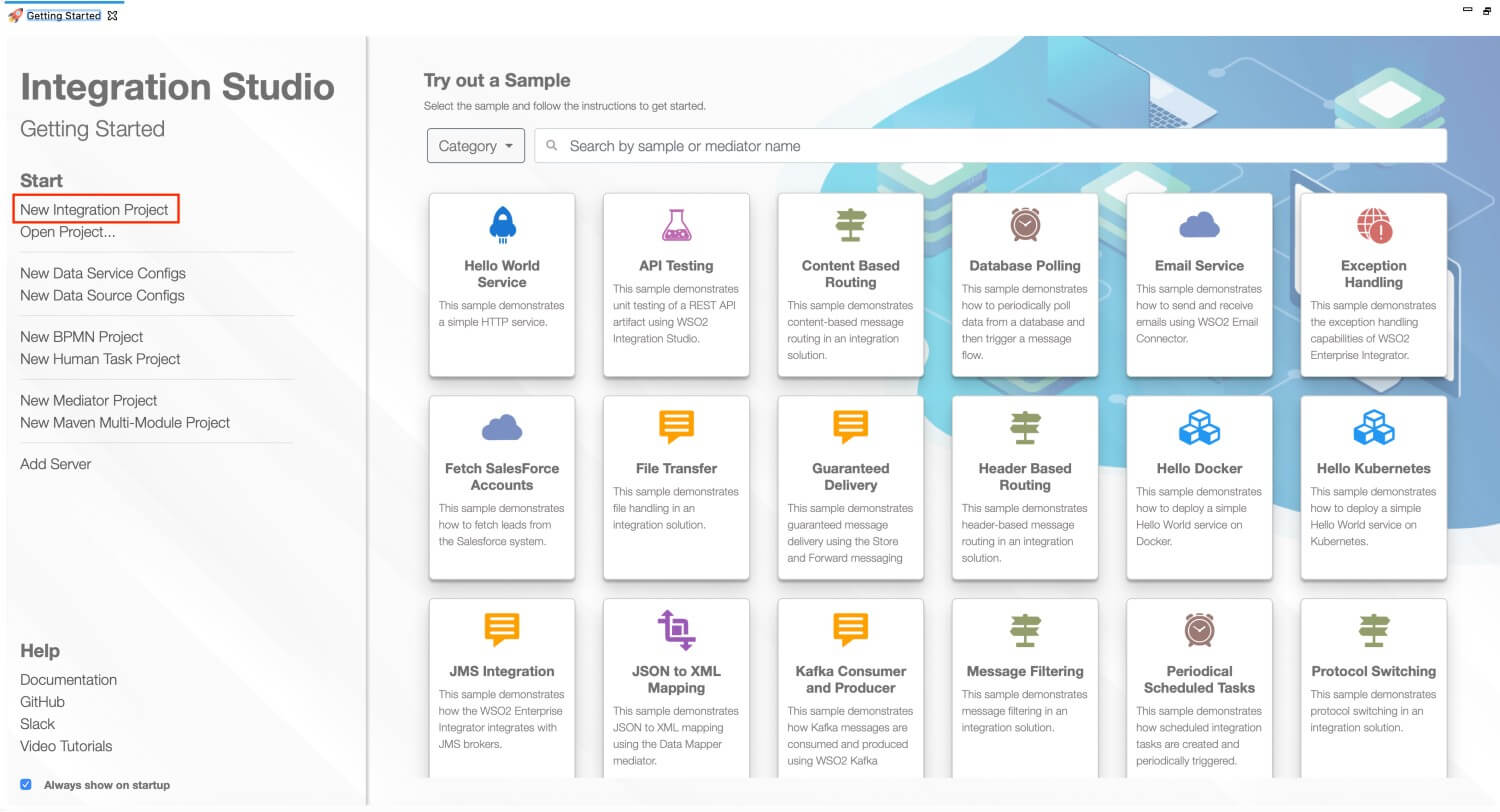
This will open the New Integration Project dialog box.

-
Enter
SampleServicesas the project name and select the following check boxes to create the required modules.- Create ESB Configs
- Create Composite Exporter
-
Click Finish.
You will now see the projects listed in the Project Explorer.
Create Endpoints
In this tutorial, we have three hospital services hosted as the backend:
- Grand Oak Community Hospital:
http://localhost:9090/grandoaks/ - Clemency Medical Center:
http://localhost:9090/clemency/ - Pine Valley Community Hospital:
http://localhost:9090/pinevalley/
The request method is POST and the format of the request URL expected by the back-end services is
http://localhost:9090/grandoaks/categories/{category}/reserve.
Let's create three different HTTP endpoints for the above services.
- Right-click SampleServicesConfigs in the project explorer and click New -> Endpoint.
- Ensure Create a New Endpoint is selected and click Next.
-
Enter the information given below to create the new endpoint.
Property Value Description Endpoint Name GrandOakEPThe name of the endpoint representing the Grand Oaks Hospital service. Endpoint Type HTTP EndpointIndicates that the back-end service is HTTP. URI Template http://localhost:9090/grandoaks/categories/{uri.var.category}/reserveThe template for the request URL expected by the back-end service. Method POSTEndpoint HTTP REST Method. Save Endpoint in SampleServicesConfigsThis is the ESB Config module we created in the last section. 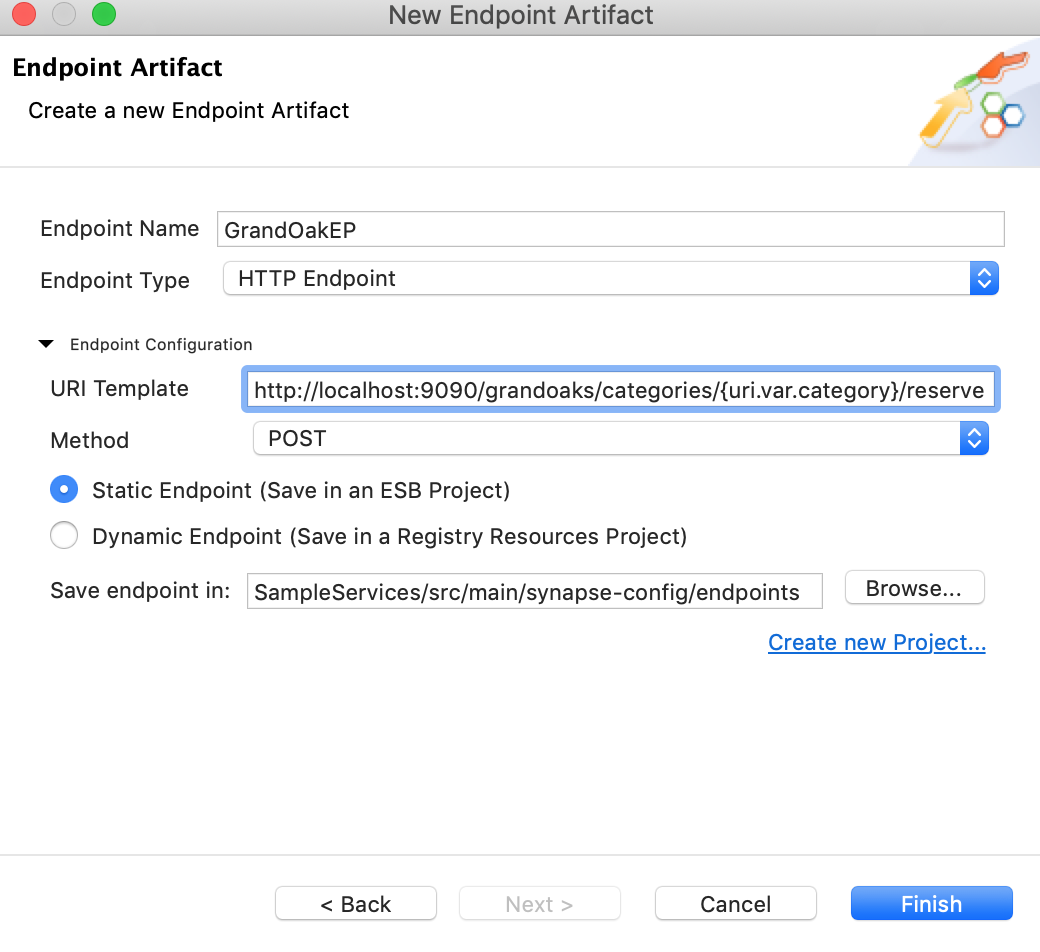
-
Click Finish.
- Similarly, create the HTTP endpoints for the other two hospital services using the URI Templates given below:
- ClemencyEP:
http://localhost:9090/clemency/categories/{uri.var.category}/reserve - PineValleyEP:
http://localhost:9090/pinevalley/categories/{uri.var.category}/reserve
- ClemencyEP:
You have now created the three endpoints for the hospital back-end services that will be used to make appointment reservations.
Tip
You can also create a single endpoint where the differentiation of the hospital name can be handled using a variable in the URI template. See the tutorial on Exposing Several Services as a Single Service.
Using three different endpoints is advantageous when the back-end services are very different from one another and/or when there is a requirement to configure error handling differently for each of them.
Create a REST API
- In the Project Explorer, right-click SampleServicesConfigs and go to New -> REST API.
- Ensure Create A New API Artifact is selected and click Next.
-
Enter the details given below to create a new REST API.
Property Value Description Name HealthcareAPIThe name of the REST API. Context /healthcareHere you are anchoring the API in the /healthcarecontext. This will become part of the name of the generated URL used by the client when sending requests to the Healthcare service. For example, setting the context to /healthcare means that the API will only handle HTTP requests where the URL path starts withhttp://host:port/healthcare.Save location SampleServicesConfigs This is the ESB Config module where the artifact will be saved. -
Click the default API Resource to access the Properties tab and enter the following details:
Property Description Url Style Click in the Value field, click the down arrow, and select URI_TEMPLATE from the list. URI-Template Enter /categories/{category}/reserve.Methods From the list of methods, select POST. 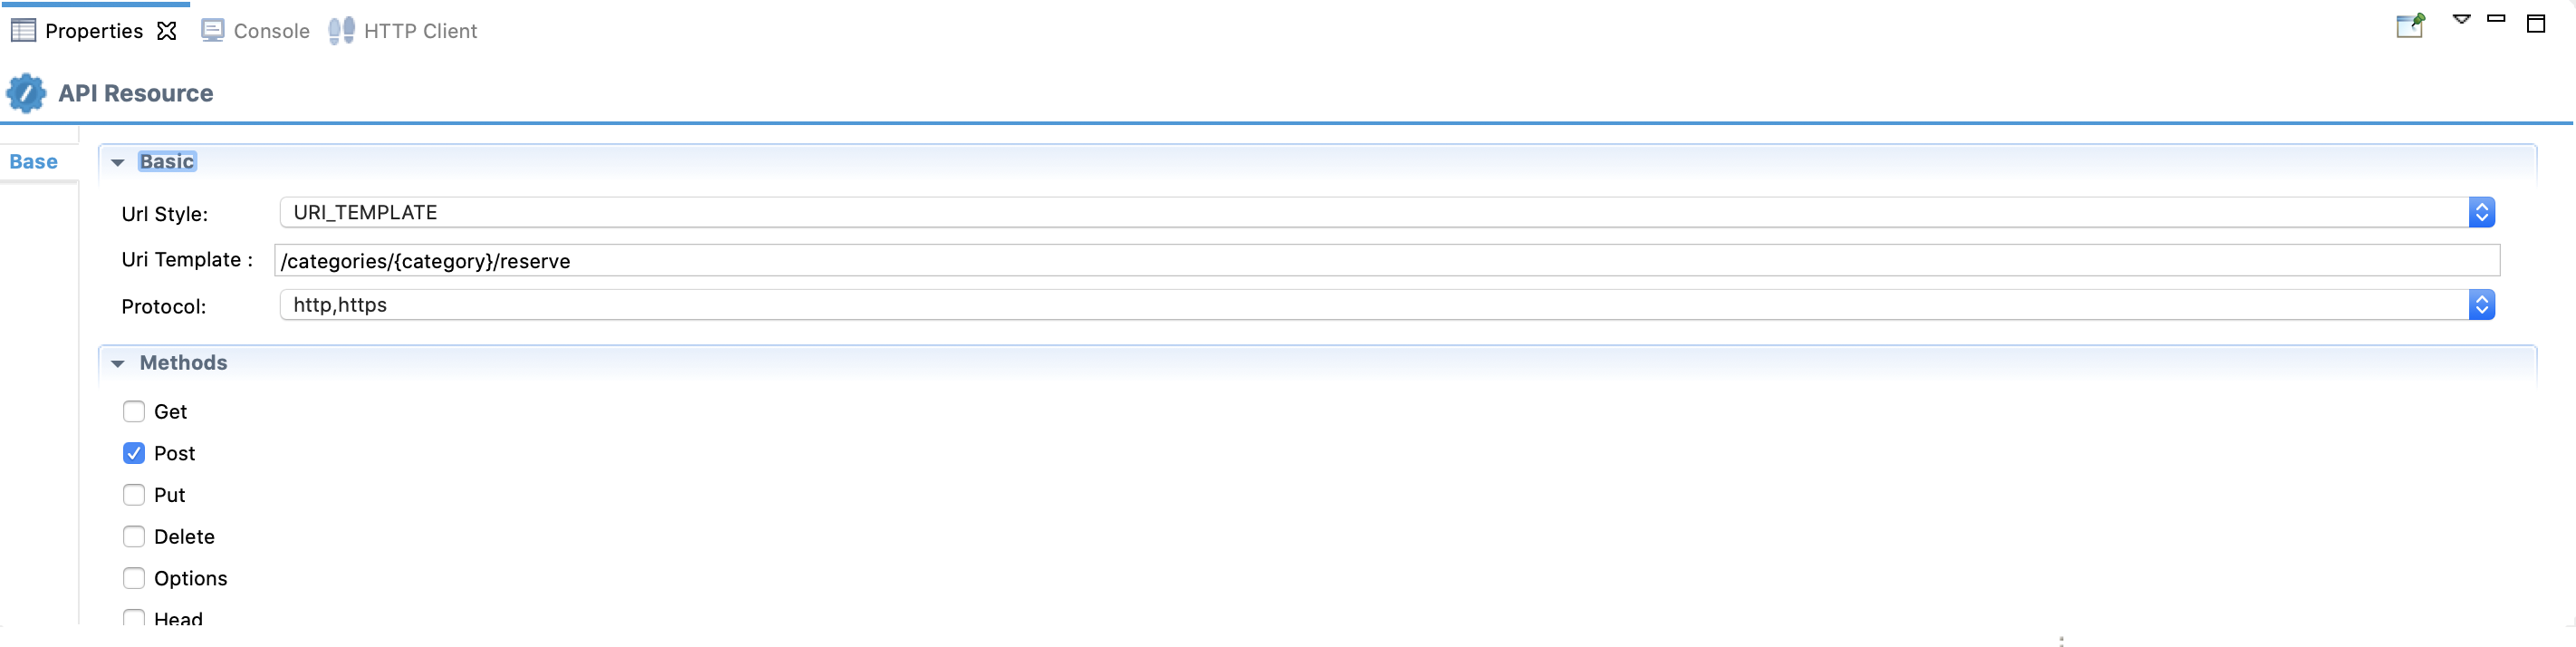
Define the mediation flow
You can now start configuring the API resource.
-
Drag a Property mediator from the Mediators palette to the In Sequence of the API resource and name it Get Hospital.
Info
This is used to extract the hospital name that is sent in the request payload.
-
With the Property mediator selected, access the Properties tab and give the following details:
Property Description Property Name Enter New Property....New Property Name Enter Hospital.Property Action Enter set.Property Scope Enter default.Value Follow the steps given below to specify the expression value:

- Click the Ex button before the Value field. This specifies the value type as expression.
- Now, click the f button to open the Expression Selector dialog box.
- Enter
json-eval($.hospital)as the expression value.
-
Drag a Switch mediator from the Mediator palette just after the Property mediator.
-
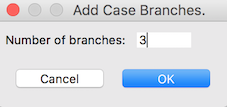
Right-click the Switch mediator you just added and select Add/Remove Case to add the number of cases you want to specify.
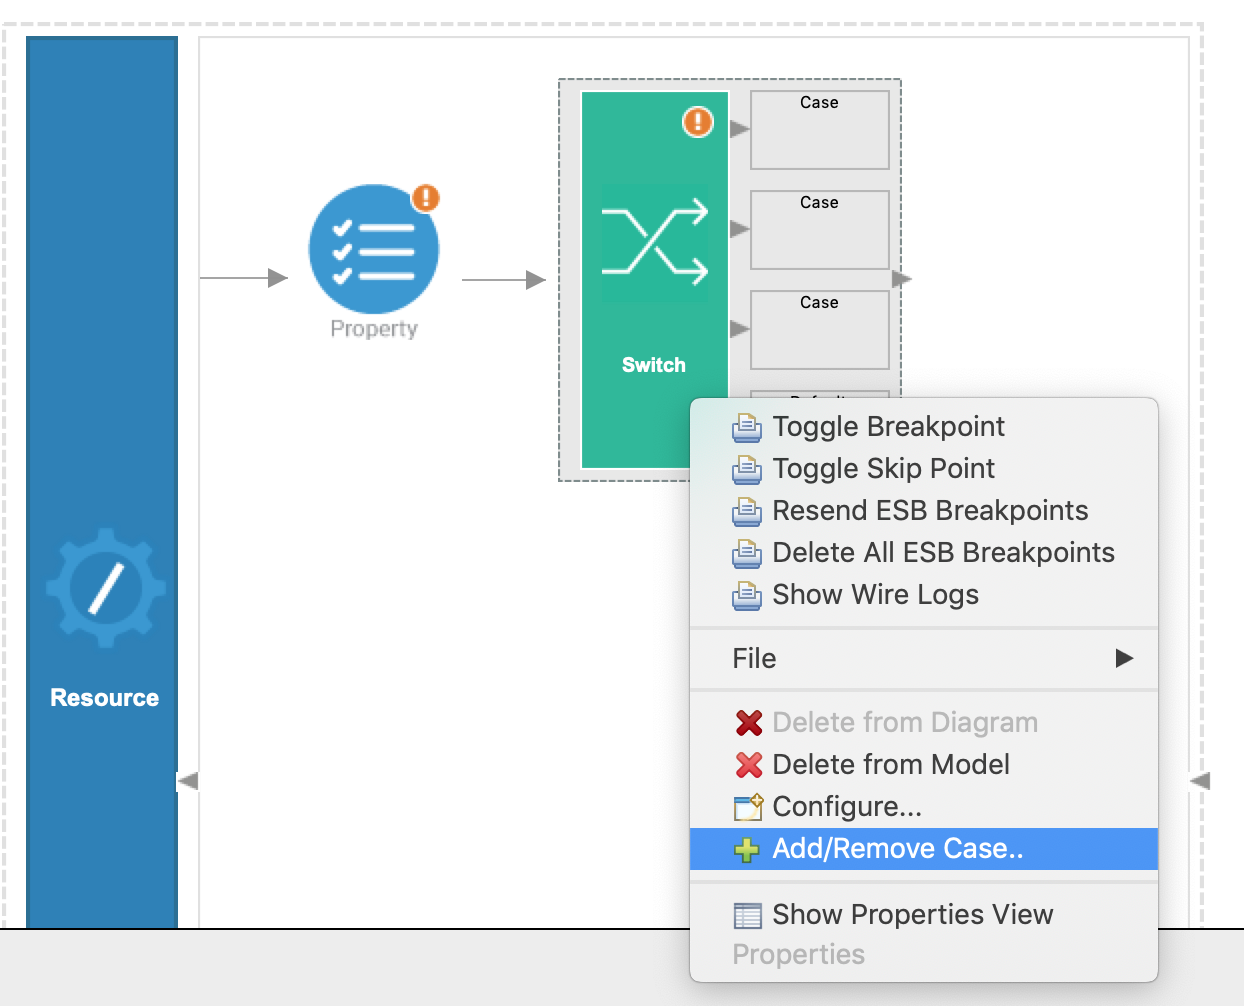
We have three different hospital endpoints, which corresponds to three switch cases. Enter 3 for Number of branches and click OK.
-
With the Switch mediator selected, go to the Properties tab and give the following details:
Property Description Source XPath The Source XPath field is where we specify the XPath expression, which obtains the value of the Hospital that we stored in the Property mediator.
Follow the steps given below to specify the expression:
- Click the text box of the Source XPath property. This opens the Expression Selector dialog box.
- Select Expression from the list.
- Enter
get-property('Hospital')to overwrite the default expression. - Click OK.
Case Branches Follow the steps given below to add the case branches:
- Double click each case regex (corresponding to each branch) that is listed. This will open the SwitchCaseBranchOutputConnector dialog box.
-
Change the RegEx values for the switch cases as follows:
- Case 1: grand oak community hospital
- Case 2: clemency medical center
- Case 3: pine valley community hospital
- Click OK .
-
Drag a Log mediator to the first Case box of the Switch mediator and name it Grand Oak Log.
Info
This prints a message indicating to which hospital the request message is being routed.
-
With the Log mediator selected, access the Properties tab and give the following details:
Property Value Description Log Category INFOIndicates that the log contains an informational message. Log Level CUSTOMOnly specified properties will be logged by this mediator. Log Separator (blank) Since there is only one property that is being logged, we do not require a separator. Therefore, this field can be left blank. Properties Follow the steps given below to extract the stock symbol from the request and print a welcome message in the log: -
Click the plus icon (
 )
to start defining a property. This opens the LogProperty dialog box.
)
to start defining a property. This opens the LogProperty dialog box.
-
Add the following values in the LogProperty dialog box:
-
Name :
message -
Type :
EXPRESSION. (We selectEXPRESSIONbecause the required properties for the log message must be extracted from the request, which we can do using an XPath expression.) -
Property Expression : Click browse (...) in the
Property Expression field and enter
fn:concat('Routing to ', get-property('Hospital')).
Routing to <hospital name>. -
Name :
- Click OK.
-
Click the plus icon (
-
Drag a Call mediator from the Mediators pallette after the Log mediator and add the GrandOakEP endpoint from Defined Endpoints palette to the empty box adjoining the Call mediator.
-
Add Log mediators in the other two Case boxes in the Switch mediator and then enter the same properties. Make sure to name the two Log mediators as follows:
Clemency LogPine Valley Log
-
Add Call mediators after these log mediators and add the ClemencyEP and PineValleyEP endpoints respectively from the Defined Endpoints palette.
Info
You have now configured the Switch mediator to log the
Routing to <Hospital Name>message when a request is sent to this API resource. The request message will then be routed to the relevant hospital back-end service based on the hospital name that is sent in the request payload. -
Add a Log mediator to the Default (the bottom box) of the Switch mediator and configure it the same way as the previous Log mediators.
Note
Make sure to name this Fault Log and change its Property Expression as follows:
fn:concat('Invalid hospital - ', get-property('Hospital'))The default case of the Switch mediator handles the invalid hospital requests that are sent to the request payload. This logs the message (
Invalid hospital - <Hospital Name>) for requests that have the invalid hospital name. -
Drag a Respond mediator next to the Switch mediator to return the response from the health care service back to the client.
You have successfully created all the artifacts that are required for routing messages to a back-end service depending on the content in the request payload.
Step 3: Package the artifacts
Package the artifacts in your composite application module (SampleServicesCompositeExporter) to be able to deploy the artifacts in the server.
- Open the
pom.xmlfile in the composite exporter module. -
Ensure that the following artifacts are selected in the POM file.
HealthcareAPIClemencyEPGrandOakEPPineValleyEP
-
Save the changes.
Step 4: Build and run the artifacts
To test the artifacts, deploy the packaged artifacts in the embedded Micro Integrator:
- Right-click the composite exporter module and click Export Project Artifacts and Run.
- In the dialog box that opens, confirm that the required artifacts from the composite exporter module are selected.
- Click Finish.
The artifacts will be deployed in the embedded Micro Integrator and the server will start.
- See the startup log in the Console tab.
- See the URLs of the deployed services and APIs in the Runtime Services tab.
Step 5: Test the use case
Let's test the use case by sending a simple client request that invokes the service.
Start the back-end service
- Download the JAR file of the back-end service from here.
- Open a terminal, navigate to the location where your saved the back-end service.
-
Execute the following command to start the service:
java -jar Hospital-Service-JDK11-2.0.0.jar
Send the client request
Let's send a request to the API resource to make a reservation. You can use Postman application as follows:
-
Open the Postman application. If you do not have the application, download it from here : Postman
-
Add the request information as given below and click the Send button.
Method POSTHeaders Content-Type=application/jsonURL http://localhost:8290/healthcare/categories/surgery/reserve-
The URI-Template format that is used in this URL was defined when creating the API resource:
http://host:port/categories/{category}/reserve.
Body { "patient": { "name": "John Doe", "dob": "1940-03-19", "ssn": "234-23-525", "address": "California", "phone": "8770586755", "email": "[email protected]" }, "doctor": "thomas collins", "hospital_id": "grandoaks", "hospital": "grand oak community hospital", "appointment_date": "2025-04-02" }- This JSON payload contains details of the appointment reservation, which includes patient details, doctor, hospital, and data of appointment.
-
The URI-Template format that is used in this URL was defined when creating the API resource:
If you want to send the client request from your terminal:
- Install and set up cURL as your REST client.
- Create a JSON file named
request.jsonwith the following request payload.{ "patient": { "name": "John Doe", "dob": "1940-03-19", "ssn": "234-23-525", "address": "California", "phone": "8770586755", "email": "[email protected]" }, "doctor": "thomas collins", "hospital_id": "grandoaks", "hospital": "grand oak community hospital", "appointment_date": "2025-04-02" } - Open a terminal and navigate to the directory where you have saved the
request.jsonfile. - Execute the following command.
curl -v -X POST --data @request.json http://localhost:8290/healthcare/categories/surgery/reserve --header "Content-Type:application/json"
Analyze the response
You will see the following response received to your HTTP Client:
{"appointmentNumber":1,
    "doctor":
         {"name":"thomas collins",
          "hospital":"grand oak community hospital",
          "category":"surgery","availability":"9.00 a.m - 11.00 a.m",
          "fee":7000.0},
    "patient":
        {"name":"John Doe",
         "dob":"1990-03-19",
         "ssn":"234-23-525",
         "address":"California",
         "phone":"8770586755",
         "email":"[email protected]"},
    "fee":7000.0,
"confirmed":false,
"appointmentDate":"2025-04-02"}
Now check the Console tab of WSO2 Integration Studio and you will see the following message: INFO - LogMediator message = Routing to grand oak community hospital
This is the message printed by the Log mediator when the message from the client is routed to the relevant endpoint in the Switch mediator.
You have successfully completed this tutorial and have seen how the requests received by the Micro Integrator can be routed to the relevant endpoint using the Switch mediator.