Sending a Simple Message to a Service
What you'll build
Let’s try a simple scenario where a patient makes an inquiry specifying the doctor's specialization (category) to retrieve a list of doctors that match the specialization. The required information is available in a back-end microservice.
To implement this use case, you will create a REST API resource and other artifacts using WSO2 Integration Studio, and then deploy them in the embedded WSO2 Micro Integrator instance. The default API resource will be configured to receive the client request in place of the back-end service, thereby decoupling the client and the back-end service. The response message with the requested doctor details will be routed back to the client through the same API resource.
Concepts and artifacts used
- REST API
- HTTP Endpoint
- Call Mediator
- Respond Mediator
Let's get started!
Step 1: Set up the workspace
Download the relevant WSO2 Integration Studio based on your operating system.
Step 2: Develop the integration artifacts
Follow the instructions given in this section to create and configure the required artifacts.
Create an Integration project
An Integration project is a maven multi module project, which will contain all the required modules for the integration solution.
- Open WSO2 Integration Studio.
-
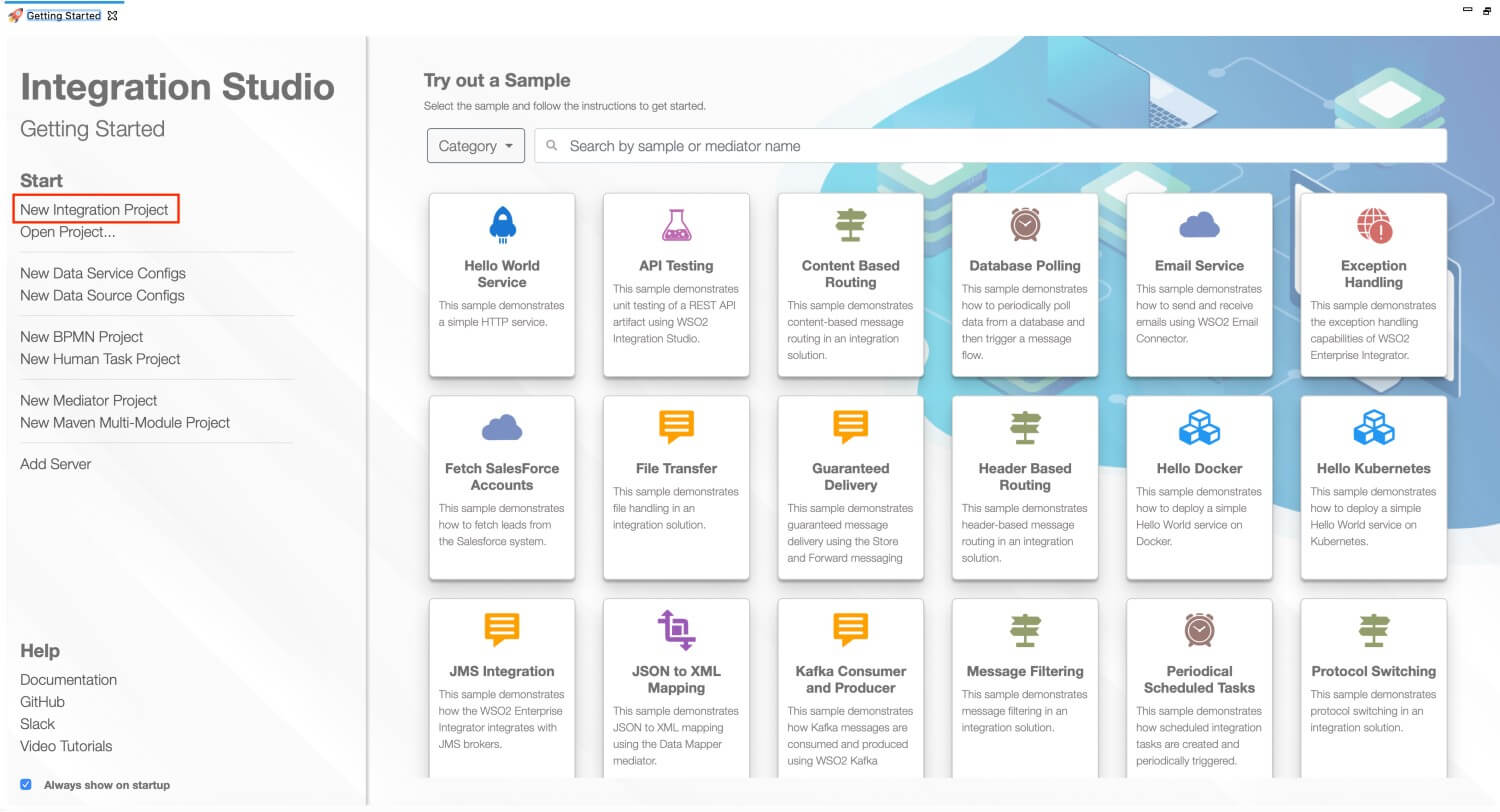
Click New Integration Project in the Getting Started tab as shown below.
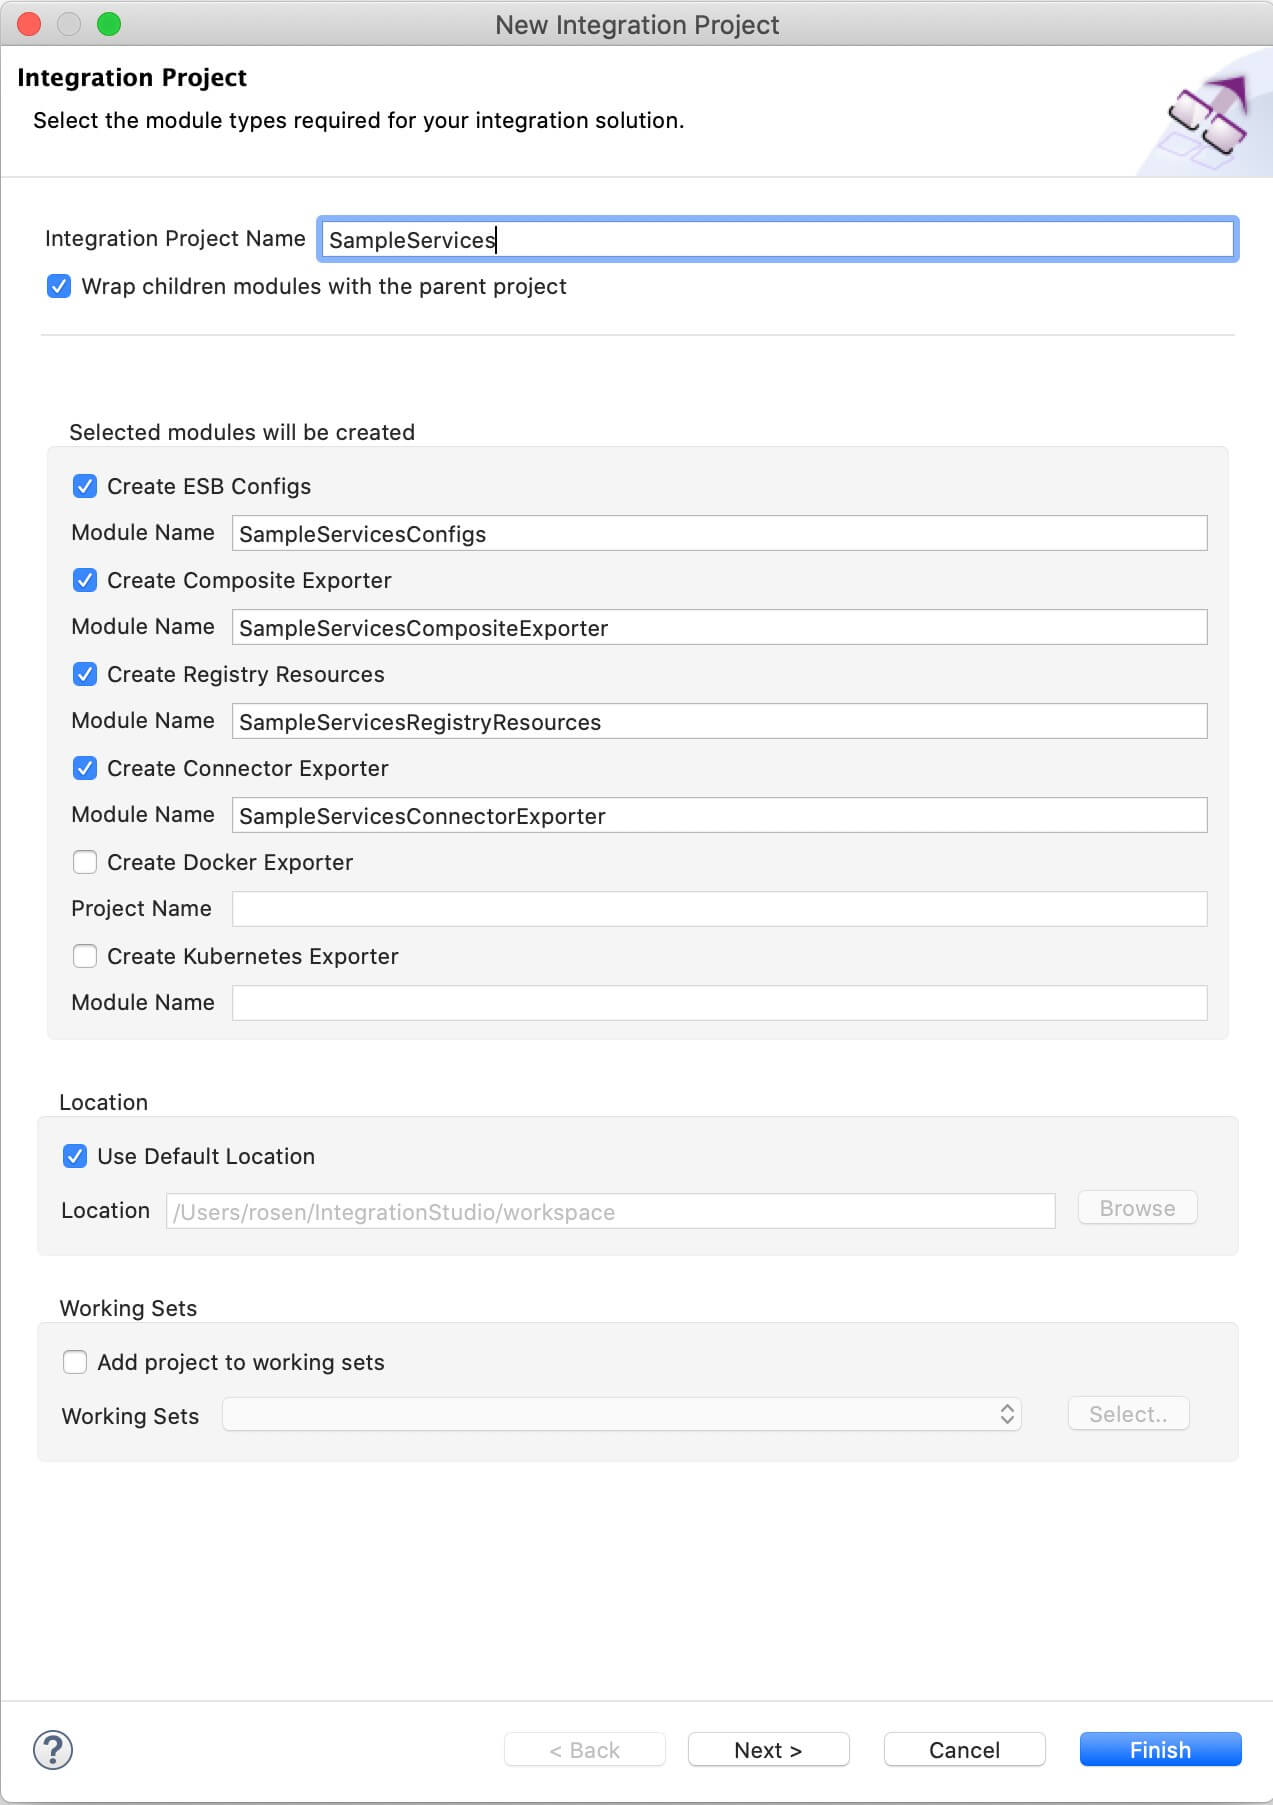
This will open the New Integration Project dialog box.
-
Enter
SampleServicesas the project name and select the following check boxes to create the required modules.- Create ESB Configs
- Create Composite Exporter
-
Click Finish.
You will now see the projects listed in the Project Explorer.
Create an Endpoint
An Endpoint artifact is required for the purpose of exposing the URL that connects to the back-end service.
- Right-click SampleServicesConfigs in the project explorer and click New -> Endpoint.
- Ensure that Create a New Endpoint is selected and click Next.
-
Enter the information given below to create the new endpoint.
Property Value Description Endpoint Name QueryDoctorEPThe name of the endpoint. Endpoint Type HTTP EndpointIndicates that the back-end service is HTTP. URI Template http://localhost:9090/healthcare/{uri.var.category}The template for the request URL expected by the back-end service. In this case, the variable 'category' that needs to be included in the request for querying doctors is represented as {uri.var.category}in the template.Method GETIndicates that we are creating this endpoint for GET requests that are sent to the back-end service. Save Endpoint in SampleServicesConfigsThis is the ESB Config module where the artifact will be saved. 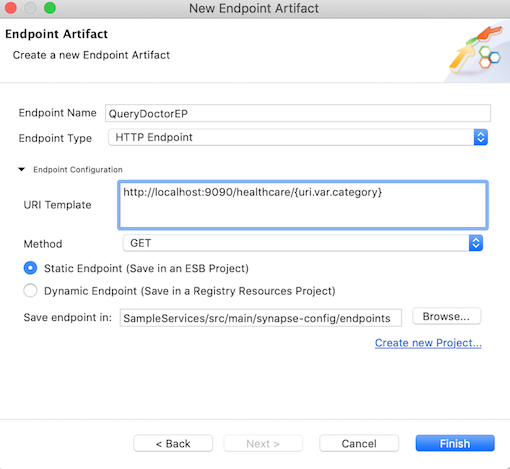
-
Click Finish.
The QueryDoctorEP endpoint is saved in theendpointsfolder within the ESB Config module of the integration project.
Create a REST API
A REST API is required for receiving the client response and the REST resource within the API will define the mediation logic that will send requests to the Healthcare back-end service and retrieve the available doctor information.
- In the Project Explorer, right-click SampleServicesConfigs and click New -> REST API.
- Ensure Create A New API Artifact is selected and click Next.
-
Enter the details given below to create a new REST API.
|Property Value Description Name HealthcareAPIThe name of the REST API. Context /healthcareHere you are anchoring the API in the /healthcarecontext. This will become part of the name of the generated URL used by the client when sending requests to the Healthcare service. For example, setting the context to /healthcare means that the API will only handle HTTP requests where the URL path starts withhttp://host:port/healthcare.Save location SampleServicesConfigs This is the ESB Config module where the artifact will be saved. 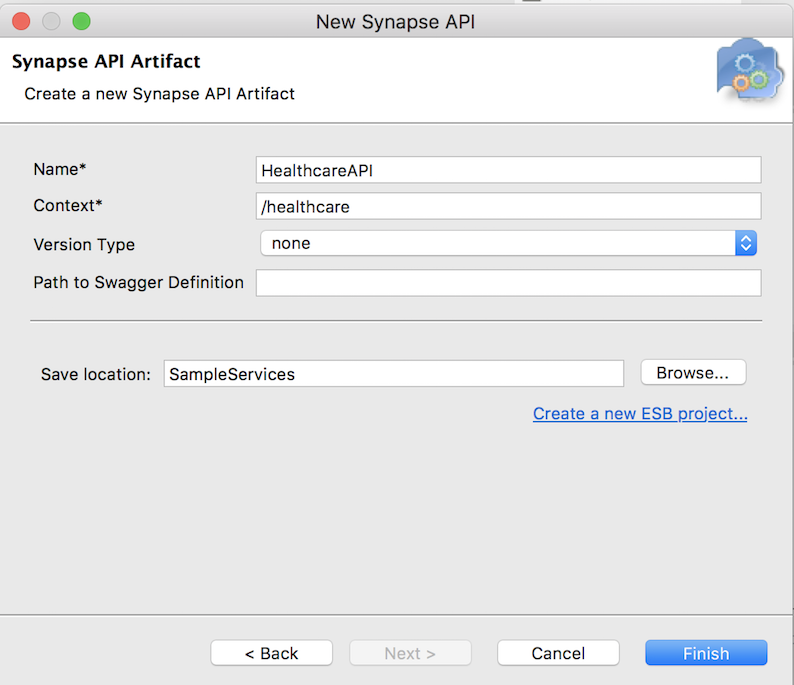
-
Click Finish.
Define the mediation flow
Once the API resource is created, the design view of the HealthcareAPI.xml file will appear as shown below.
Note
- The top part of the canvas is the In sequence, which controls how incoming messages are mediated.
- The middle part of the canvas is the Out sequence, which controls how responses are handled. In this case, a Send mediator is already in place to send responses back to the requesting client.
- The bottom part of the canvas is the Fault sequence, which allows you to configure how to handle messages when an error occurs (for more information, see Error Handling).
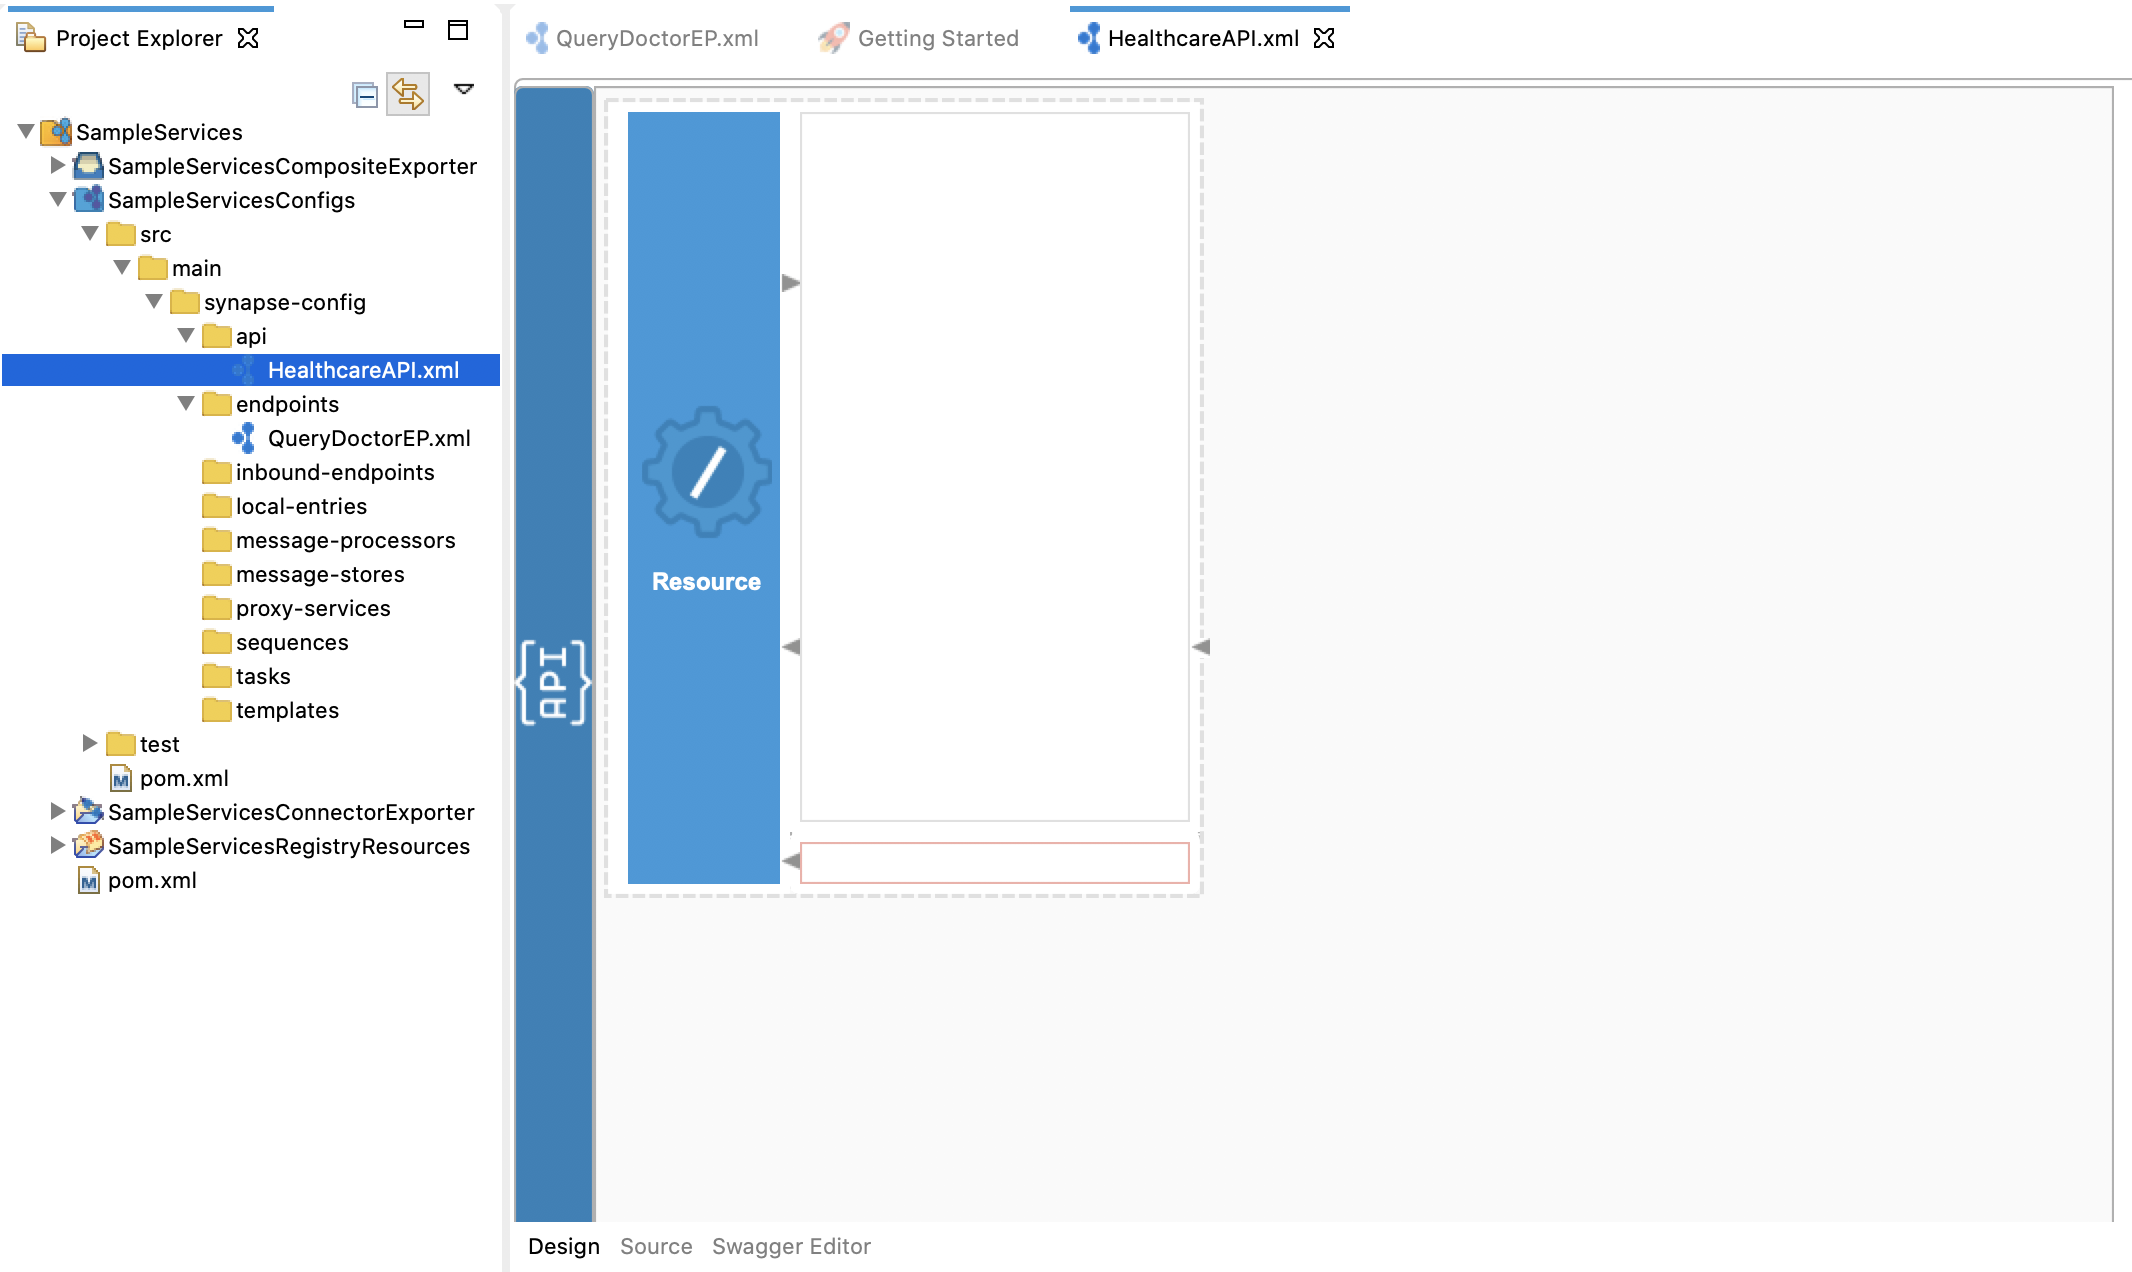
You can now start configuring the API resource.
- Double-click the Resource icon on the left side of the canvas.
The properties for the API resource appear on the Properties tab at the bottom of the window. If they do not appear, you can right-click the Resource icon and click Show Properties View. -
On the Properties tab, provide the following as Basic properties:
Property Description Url Style Click the respective Value field, click the down arrow, and then select URI_TEMPLATE from the list. URI-Template Enter /querydoctor/{category}. This defines the request URL format. In this case, the full request URL format ishttp://host:port/querydoctor/{category}where{category}is a variable.Methods See that the Get check box is selected. This defines that the API resource only handles requests where the HTTP method is GET. 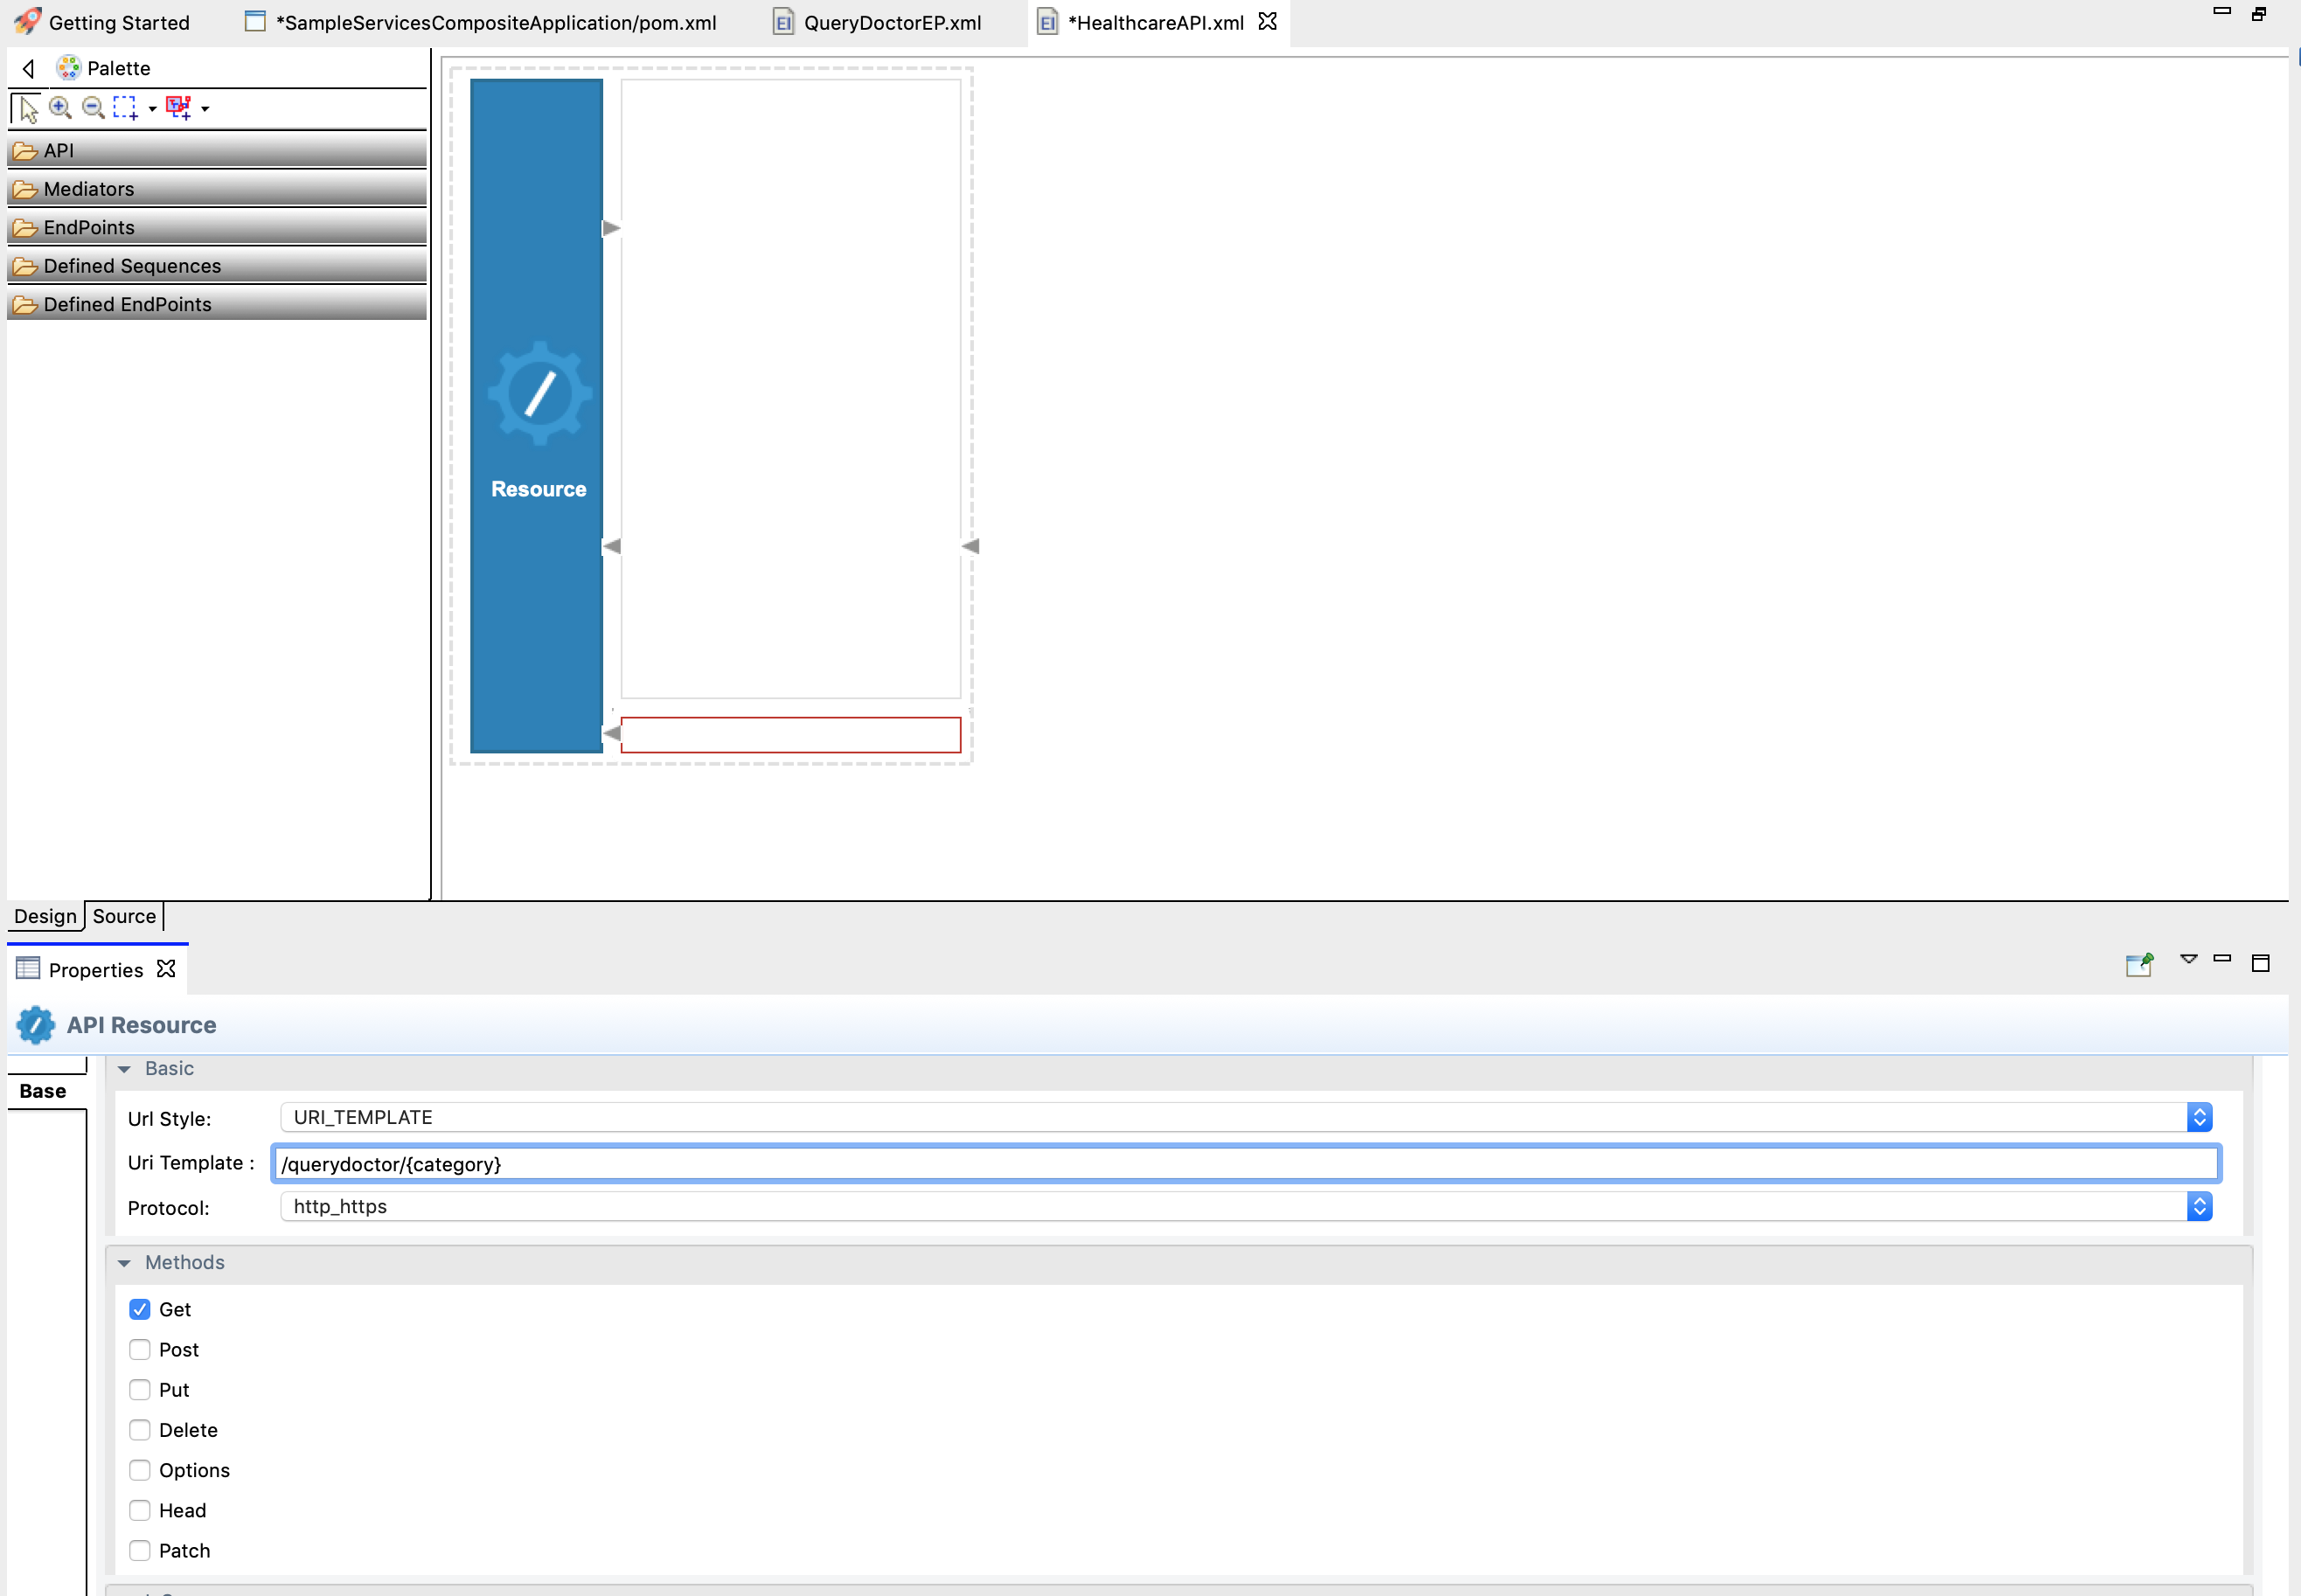
-
You can now configure the In sequence to handle requests from the client:
-
From the Mediators palette, click and drag a Log mediator to the In sequence (the top of the canvas).
Note
The Log mediator logs messages when the request is received by the In sequence of the API resource. In this scenario, let's configure the Log mediator to display the following message: “Welcome to the HealthcareService”.
-
With the Log mediator selected, access the Property tab and fill in the information in the table below:
Field Value Description Log Category INFOIndicates that the log contains an informational message. Log Level CustomWhen Customis selected, only specified properties will be logged by this mediator.Log Separator (blank)Since there is only one property that is being logged, you do not require a separator. Therefore, leave this field blank. Properties
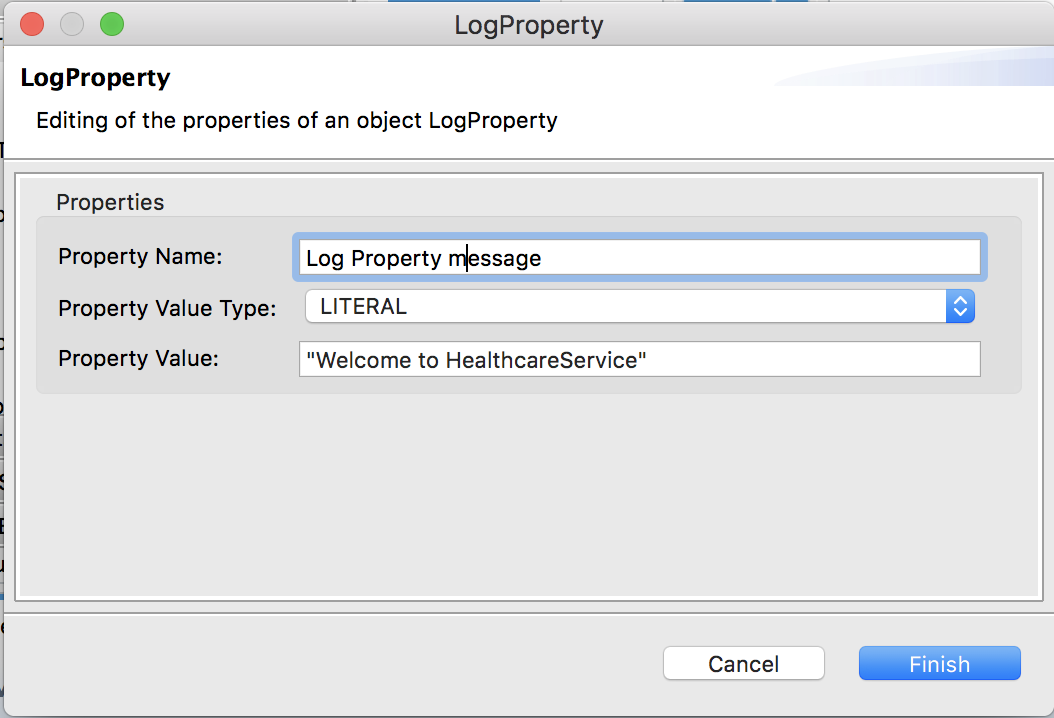
To extract the stock symbol from the request and print a welcome message in the log, click the plus icon ( ) in the Properties section, and then add the following values:
- Name:
Log Property message - Type:
LITERAL
(We select LITERAL because the required log message is a static value.) - Value/Expression :
"Welcome to HealthcareService"
Description Request LogThe Description field provides the name that appears for the Log mediator icon in the design view. 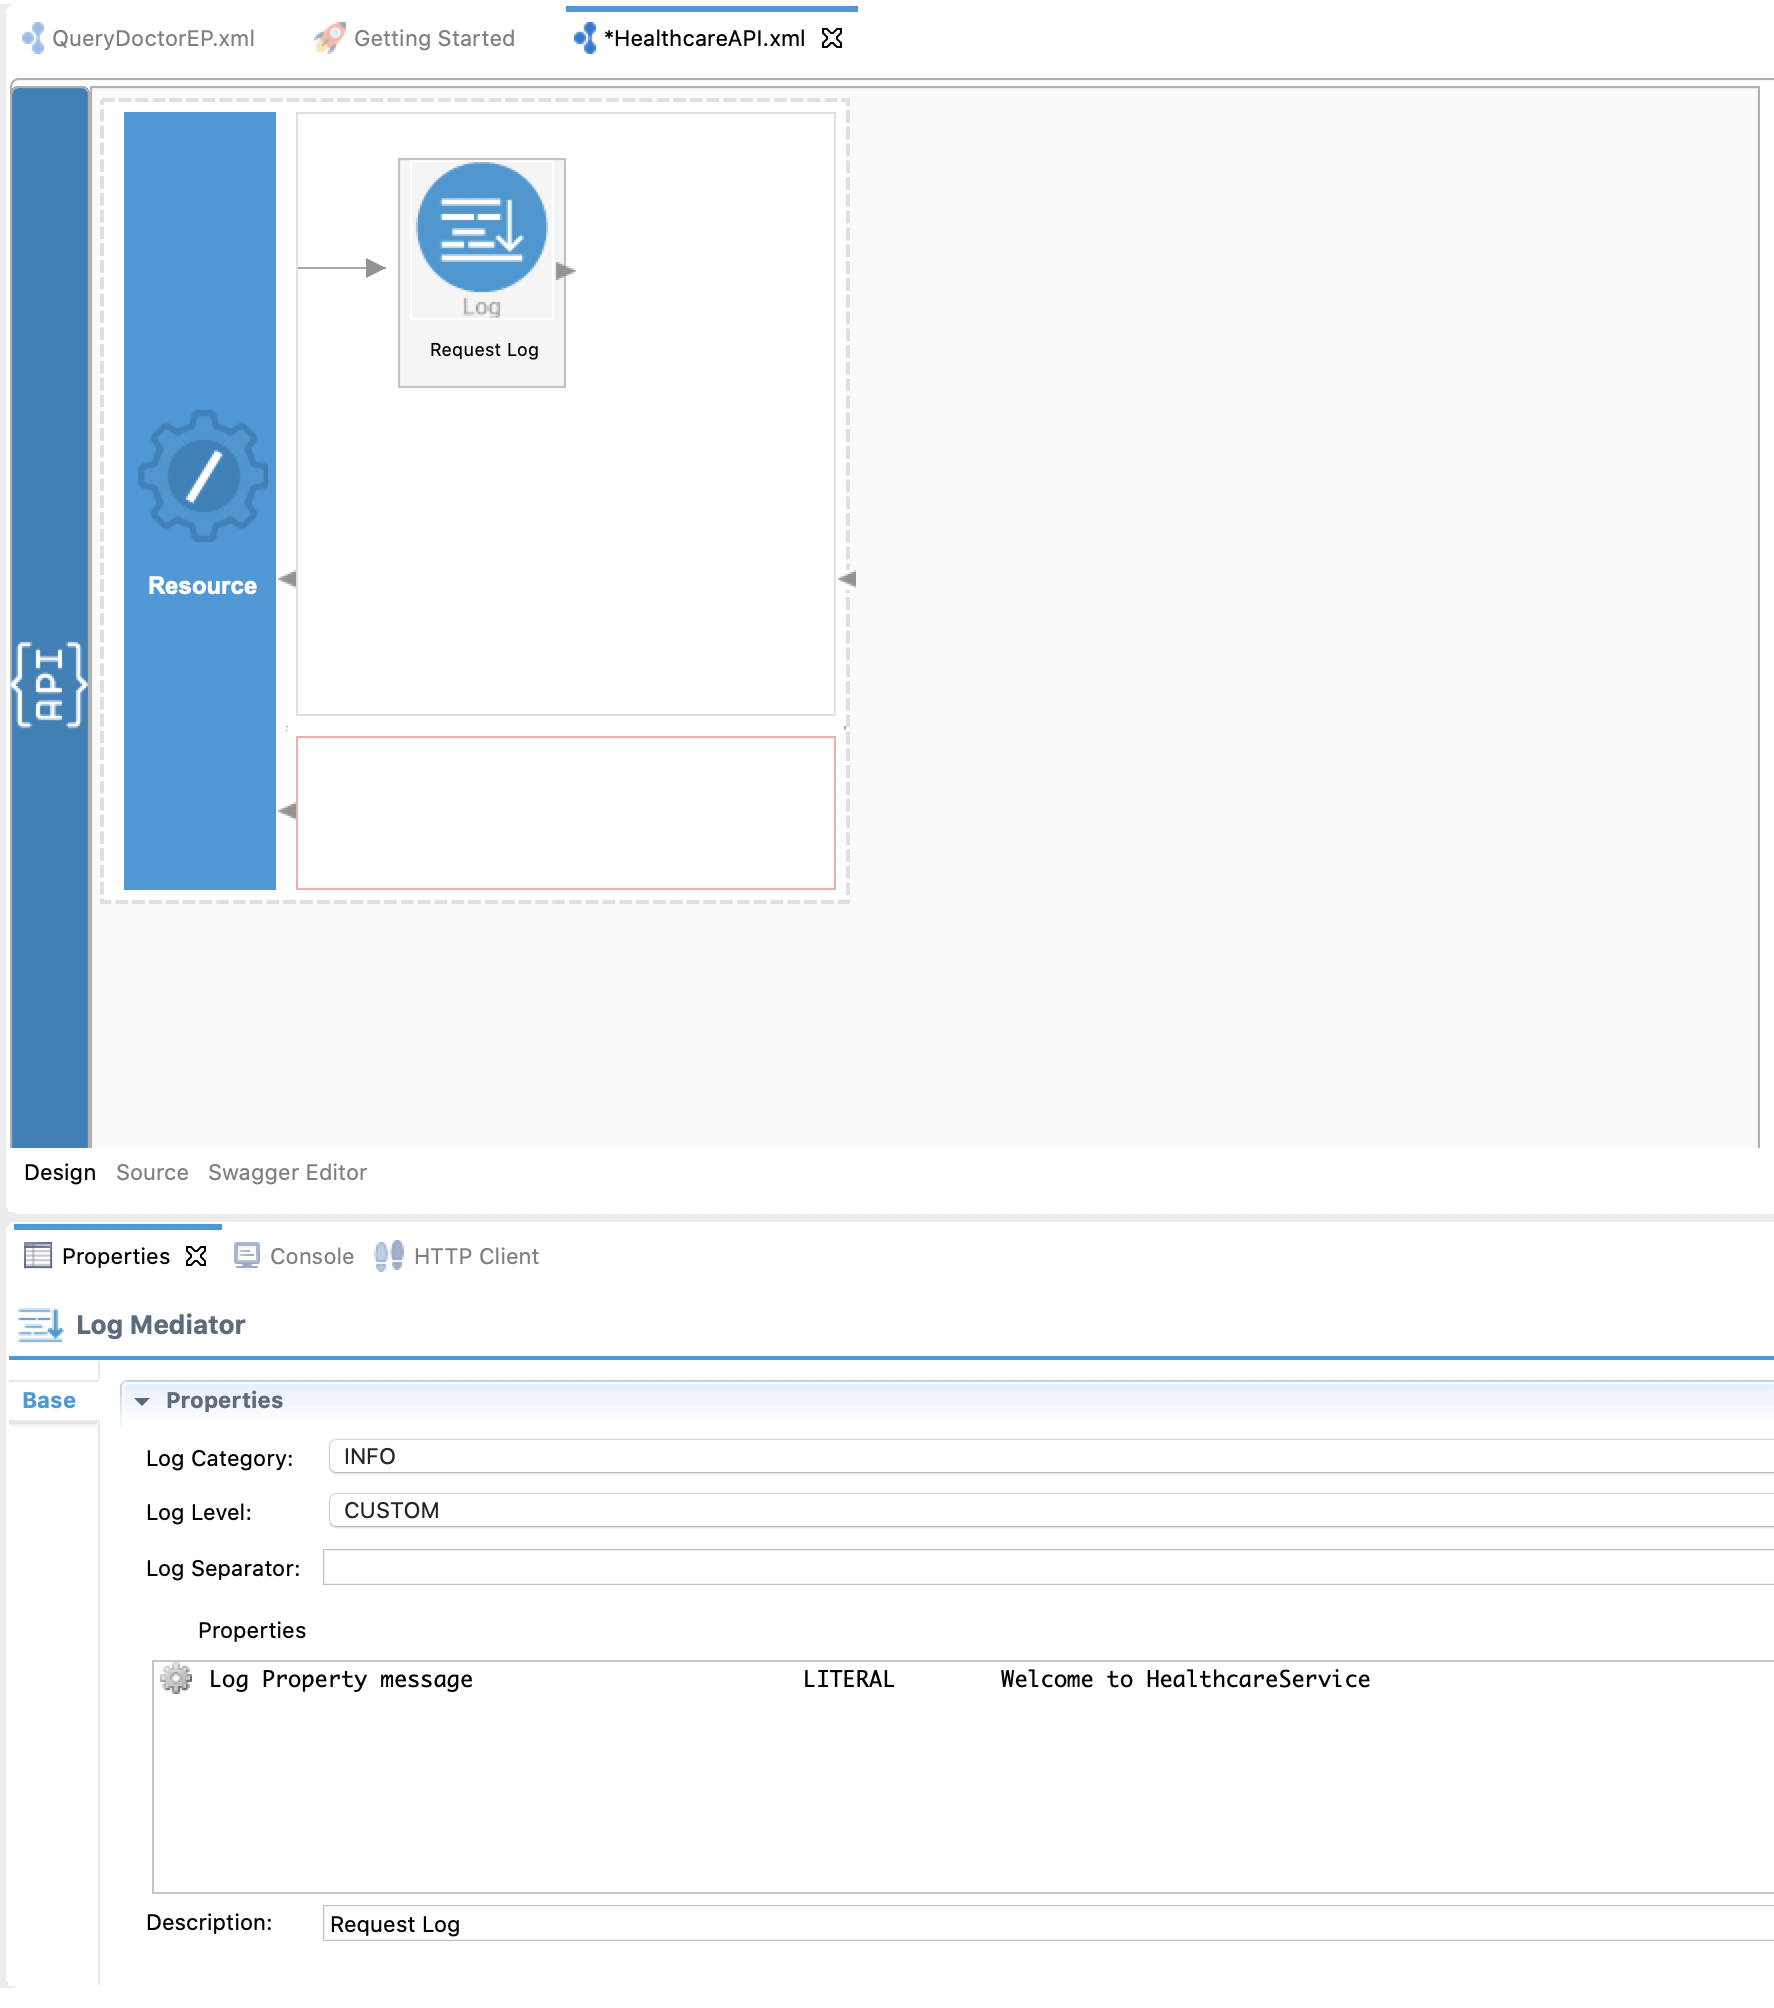
- Name:
-
Click OK to save the Log mediator configuration.
-
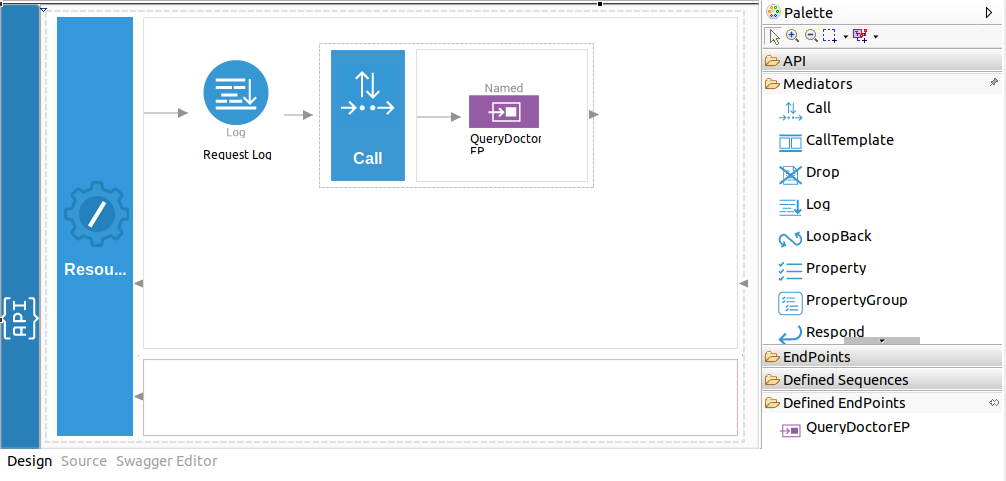
Configure a Call mediator to send the request message to the
HealthcareServiceendpoint and receive the response message.- From the Mediators palette, click and drag a Call mediator to the In sequence adjoining the Log mediator you added above.
- From the Defined EndPoints palette, click and drag the QueryDoctorEP endpoint, which we created, right next to the empty space of the Call mediator.
-
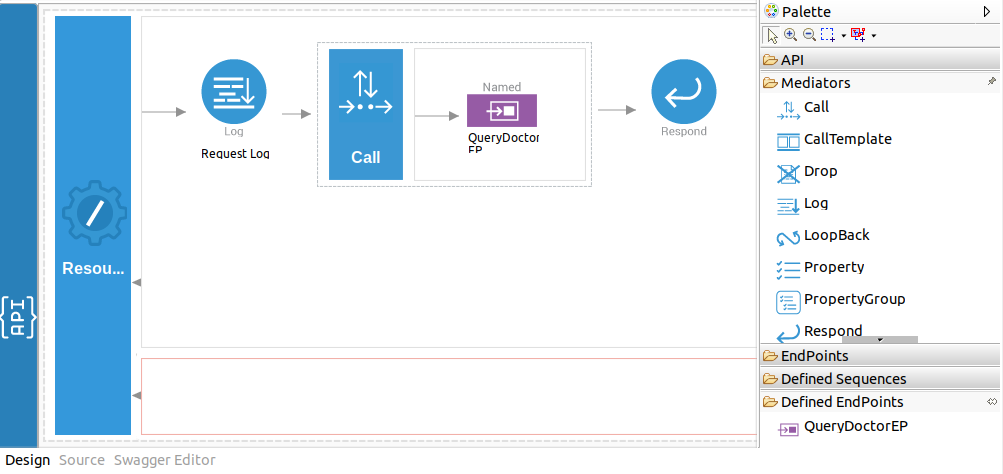
Add a Respond mediator at the end of the in sequence to send the response message from the healthcare service back to the client.
-
You have successfully created all the artifacts that are required for sending a request through the Micro Integrator to the back-end service.
Step 3: Package the artifacts
Package the artifacts in your composite exporter module to be able to deploy the artifacts in the server.
- Open the
pom.xmlfile of the SampleServicesCompositeExporter module. -
Ensure that the following artifacts are selected in the POM file.
HealthcareAPIQueryDoctorEP
-
Save the changes.
Step 4: Build and run the artifacts
To test the artifacts, deploy the packaged artifacts in the embedded Micro Integrator:
- Right-click the composite exporter module and click Export Project Artifacts and Run.
- In the dialog box that opens, confirm that the required artifacts from the composite exporter module are selected.
- Click Finish.
The artifacts will be deployed in the embedded Micro Integrator and the server will start.
- See the startup log in the Console tab.
- See the URLs of the deployed services and APIs in the Runtime Services tab.
Step 5: Test the use case
Let's test the use case by sending a simple client request that invokes the service.
Start the back-end service
- Download the JAR file of the back-end service from here.
- Open a terminal, navigate to the location where your saved the back-end service.
-
Execute the following command to start the service:
java -jar Hospital-Service-JDK11-2.0.0.jar
Send the client request
Let's send the request to the API. You can use the embedded HTTP Client of WSO2 Integration Studio as follows:
-
Open the Postman application. If you do not have the application, download it from here : Postman
-
Add the request information as given below and click the Send button.
Method GETURL http://localhost:8290/healthcare/querydoctor/surgery
If you want to send the client request from your terminal:
- Install and set up cURL as your REST client.
- Execute the following command.
curl -v http://localhost:8290/healthcare/querydoctor/surgery
Analyze the response
You will see the response message from the HealthcareService with a list of available doctors and the relevant details.
[
  {"name":"thomas collins",
  "hospital":"grand oak community hospital",
  "category":"surgery",
  "availability":"9.00 a.m - 11.00 a.m",
  "fee":7000.0},
  {"name":"anne clement",
   "hospital":"clemency medical center",
   "category":"surgery",
   "availability":"8.00 a.m - 10.00 a.m",
   "fee":12000.0},
  {"name":"seth mears",
   "hospital":"pine valley community hospital",
   "category":"surgery",
   "availability":"3.00 p.m - 5.00 p.m",
   "fee":8000.0}
]
Now, check the Console tab of WSO2 Integration Studio and you will see the following message:
INFO - LogMediator message = "Welcome to HealthcareService"
You have now created and deployed an API resource in the Micro Integrator, which receives requests, logs a message using the Log mediator, sends the request to a back-end service using the Send mediator, and returns a response to the requesting client.