Quick Start Guide
Let's get started with WSO2 Micro Integrator by running a simple integration use case in your local environment.
Before you begin...
- Install Java SE Development Kit (JDK) version 11.
-
In the environment variables, set the
JAVA_HOMEenvironment variable.Info
For more information on setting the
JAVA_HOMEenvironment variable for different operating systems, see the Install and Setup documentation. -
Go to the WSO2 Micro Integrator web page, click Download, and then click Zip Archive under the 'Latest Release' section to download the Micro Integrator distribution as a ZIP file.
-
In the same page click on Integration Studio under the 'Other Components' section to download WSO2 Integration Studio.
Info
For more information, see the installation instructions.
-
Download the sample files. From this point onwards, let's refer to this directory as
<mi-qsg-home>. - Download curl or a similar tool that can call an HTTP endpoint.
What you'll build
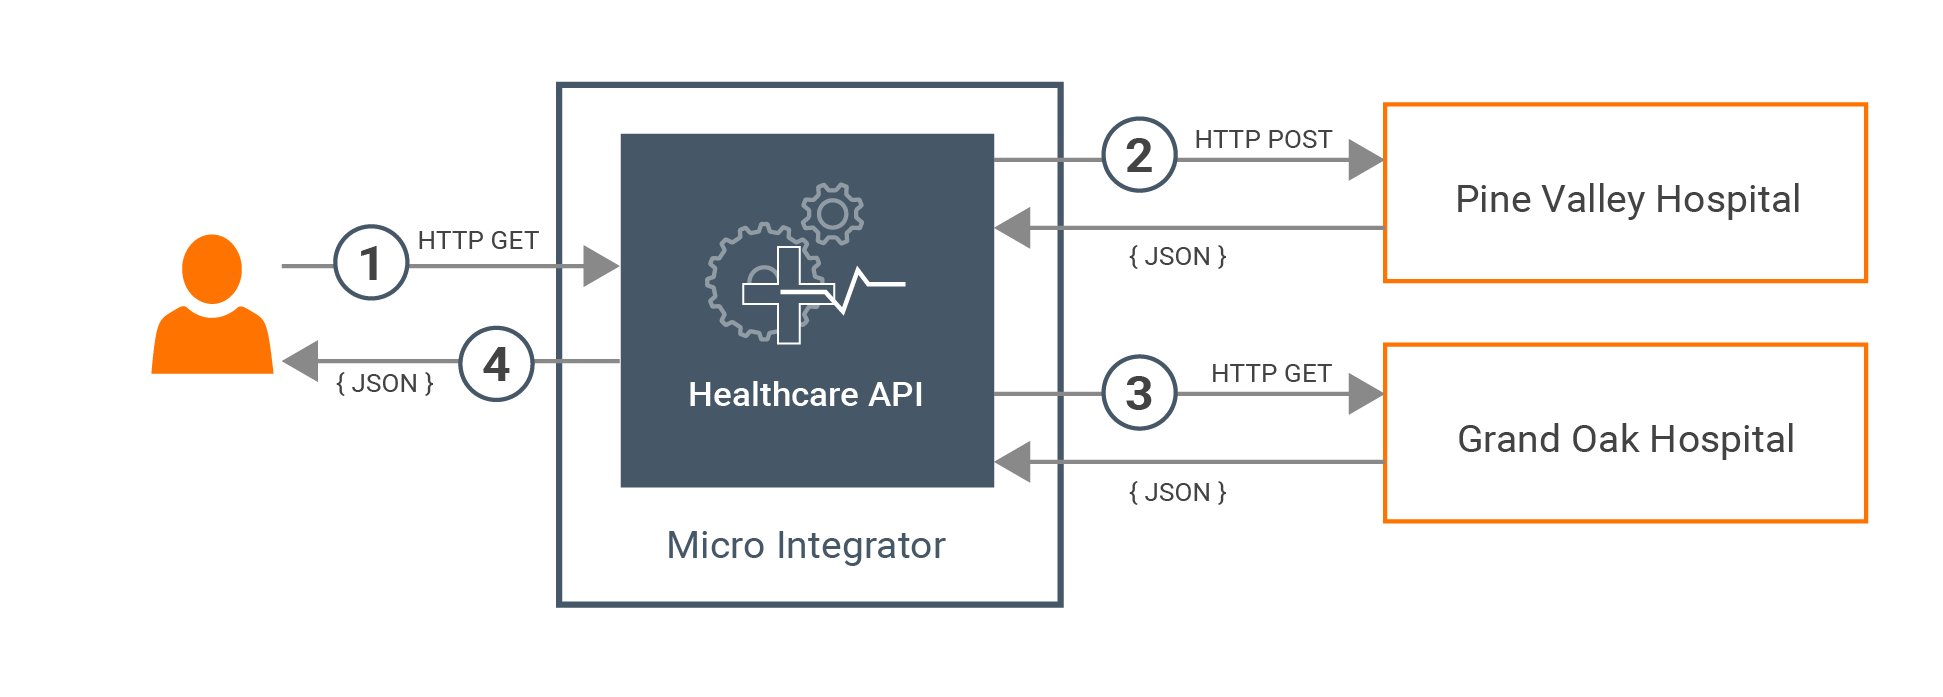
This is a simple service orchestration scenario. The scenario is about a basic healthcare system where the Micro Integrator is used to integrate two back-end hospital services to provide information to the client.
Most healthcare centers have a system that is used to make doctor appointments. To check the availability of the doctors for a particular time, users typically need to visit the hospitals or use each and every online system that is dedicated to a particular healthcare center. Here, we are making it easier for patients by orchestrating those isolated systems for each healthcare provider and exposing a single interface to the users.
Tip
You may export<mi-qsg-home>/HealthcareIntegrationProject to Integration Studio to view the project structure.
In the above scenario, the following takes place:
-
The client makes a call to the Healthcare API created using Micro Integrator.
-
The Healthcare API calls the Pine Valley Hospital back-end service and gets the queried information.
-
The Healthcare API calls the Grand Oak Hospital back-end service and gets the queried information.
-
The response is returned to the client with the required information.
Both Grand Oak Hospital and Pine Valley Hospital have services exposed over the HTTP protocol.
The Pine Valley Hospital service accepts a POST request in the following service endpoint URL.
http://<HOST_NAME>:<PORT>/pineValley/doctors
The Grand Oak Hospital service accepts a GET request in the following service endpoint URL.
http://<HOST_NAME>:<PORT>/grandOak/doctors/<DOCTOR_TYPE>
The expected payload should be in the following JSON format:
{
        "doctorType": "<DOCTOR_TYPE>"
}
Let’s implement a simple integration solution that can be used to query the availability of doctors for a particular category from all the available healthcare centers.
Step 1 - Set up the workspace
To set up the integration workspace for this quick start guide, we will use an integration project that was built using WSO2 Integration Studio:
-
Extract the downloaded WSO2 Micro Integrator and sample files into the same directory location.
-
Navigate to the
<mi-qsg-home>directory. The following project files and executable back-end services are available in the<mi-qsg-home>. -
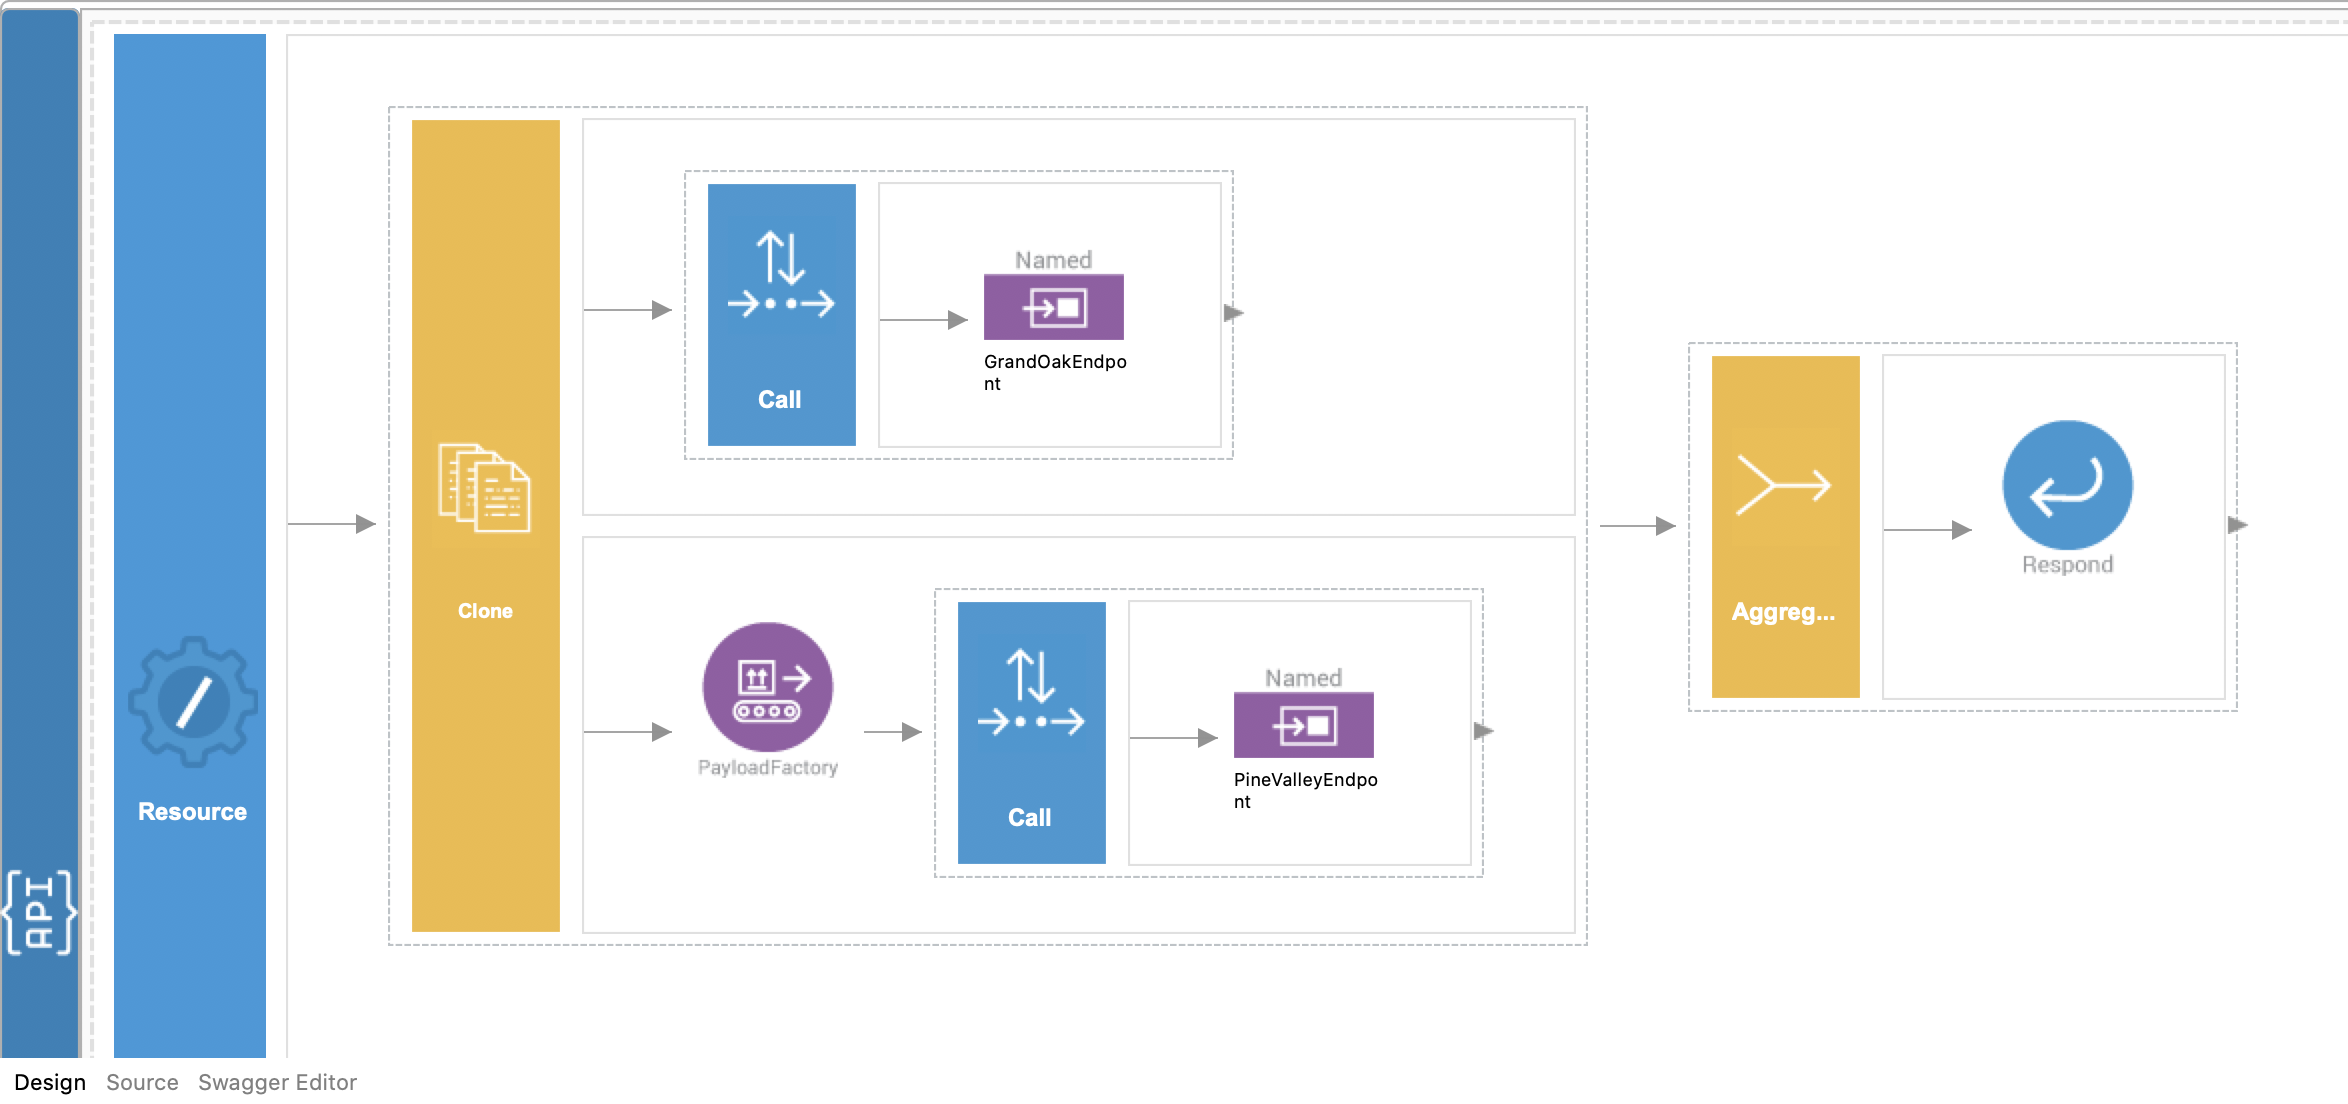
HealthcareIntegrationProject/HealthcareIntegrationProjectConfigs: This is the ESB Config module with the integration artifacts for the healthcare service. This service consists of the following REST API:
HealthcareAPI.xml
<?xml version="1.0" encoding="UTF-8"?>
<api context="/healthcare" name="HealthcareAPI" xmlns="http://ws.apache.org/ns/synapse">
    <resource methods="GET" uri-template="/doctor/{doctorType}">
        <inSequence>
            <clone>
                <target>
                    <sequence>
                        <call>
                            <endpoint key="GrandOakEndpoint"/>
                        </call>
                    </sequence>
                </target>
                <target>
                    <sequence>
                        <payloadFactory media-type="json">
                            <format>{
                            "doctorType": "$1"
                            }</format>
                            <args>
                                <arg evaluator="xml" expression="$ctx:uri.var.doctorType"/>
                            </args>
                        </payloadFactory>
                        <call>
                            <endpoint key="PineValleyEndpoint"/>
                        </call>
                    </sequence>
                </target>
            </clone>
            <aggregate>
                <completeCondition>
                    <messageCount max="-1" min="-1"/>
                </completeCondition>
                <onComplete aggregateElementType="root" expression="json-eval($.doctors.doctor)">
                    <respond/>
                </onComplete>
            </aggregate>
        </inSequence>
        <outSequence/>
        <faultSequence/>
    </resource>
</api>
It also contains the following two files in the metadata folder.
Tip
This data is used later in this guide by the API management runtime to generate the managed API proxy.
HealthcareAPI_metadata.yaml This file contains the metadata of the integration service. The default serviceUrl is configured as http://localhost:8290/healthcare. If you are running Micro Integrator on a different host and port, you may have to change these values.HealthcareAPI_swagger.yaml This Swagger file contains the OpenAPI definition of the integration service. -
HealthcareIntegrationProject/HealthcareIntegrationProjectCompositeExporter: This is the Composite Application Project folder, which contains the packaged CAR file of the healthcare service.
-
Backend: This contains an executable .jar file that contains mock back-end service implementations for the Pine Valley Hospital and Grand Oak Hospital.
-
bin: This contains a script to copy artifacts and run the backend service.
Step 2 - Running the integration artifacts
Follow the steps given below to run the integration artifacts we developed on a Micro Integrator instance that is installed on a VM.
-
Run
run.sh/run.batscript in<mi-qsg-home>/binbased on your operating system to start up the workspace.- Open a terminal and navigate to the
<mi-qsg-home>/binfolder. -
Execute the relevant OS specific command:
sh run.shrun.batTip
The script assumes
MI_HOMEand<mi-qsg-home>are located in the same directory. It carries out the following steps.- Start the back-end services.
- Two mock hospital information services are available in the `DoctorInfo.jar` file located in the `<mi-qsg-home>/Backend/` directory. - To manually start the service, open a terminal window, navigate to the `<mi-qsg-home>/Backend/` folder, and use the following command to start the services: ```bash java -jar DoctorInfo.jar ```- Deploy the Healthcare service.
- Copy the CAR file of the Healthcare service (HealthcareIntegrationProjectCompositeExporter_1.0.0-SNAPSHOT.car) from the `<mi-qsg-home>/HealthcareIntegrationProject/HealthcareIntegrationProjectCompositeExporter/target/` directory to the `<MI_HOME>/repository/deployment/server/carbonapps` directory.
- Open a terminal and navigate to the
-
Start the Micro Integrator.
- Execute the relevant command in a terminal based on the OS:
=== "On MacOS/Linux/CentOS"
=== "On Windows"sh micro-integrator.sh
micro-integrator.bat -
(Optional) Start the Dashboard.
If you want to view the integration artifacts deployed in the Micro Integrator, you can start the dashboard. The instructions on running the MI dashboard is given in the installation guide:
You can now test the HealthcareIntegrationService that you just generated.
Step 3 - Testing the integration service
-
Invoke the healthcare service.
Open a terminal and execute the following curl command to invoke the service:
curl -v http://localhost:8290/healthcare/doctor/OphthalmologistUpon invocation, you should be able to observe the following response:
Congratulations! Now you have created your first integration service. Optionally, you can follow the steps given below to expose the service as a Managed API in API Manager.[ [ { "name":"John Mathew", "time":"03:30 PM", "hospital":"Grand Oak" }, { "name":"Allan Silvester", "time":"04:30 PM", "hospital":"Grand Oak" } ], [ { "name":"John Mathew", "time":"07:30 AM", "hospital":"pineValley" }, { "name":"Roma Katherine", "time":"04:30 PM", "hospital":"pineValley" } ] ]